 GoHighLevel Sub-Account (Step-by-Step Guide)”>

Connect Stripe to GoHighLevel Without Breaking Your Funnel
If you want to collect payments, sell offers, or charge subscriptions inside GoHighLevel, the very first step is connecting Stripe to your sub-account. Once that connection is live, you can power everything from simple payment links to fully automated funnels.
In this guide you’ll:
- See the three different ways to open the Stripe integration inside a GoHighLevel sub-account.
- Get a clear, step-by-step walkthrough for each path.
- Learn how to test and troubleshoot the connection so you don’t lose revenue to broken checkouts.
If you’re not on GoHighLevel yet, you can start a free GoHighLevel trial here and follow along as you set up payments.
Why connect Stripe to your GoHighLevel sub-account?
Connecting Stripe is what turns GoHighLevel from a CRM and funnel builder into a revenue engine. Once Stripe is integrated with a sub-account, you can:
- Take one-time payments directly from funnels, websites, and forms.
- Sell recurring subscriptions for memberships, retainers, and programs.
- Charge for courses, coaching, and services without bolting on extra tools.
- Track payments, refunds, and customer value alongside your pipelines and automations.
Stripe handles the heavy lifting for card processing and payouts, while GoHighLevel handles funnels, automation, and customer journeys. Together they give you an end‑to‑end system for turning traffic into revenue.
If you’re serious about scaling with predictable payments and automation, this integration isn’t optional—it’s foundational.
Want a done‑for‑you setup? Revset Labs is an AI automation and marketing agency that builds payment-ready GoHighLevel systems for founders and agencies. Once your Stripe connection is in place, our team can help you design funnels, offers, and automations around it.
Before you connect: prerequisites & quick checks
Make sure these basics are covered before you start clicking buttons:
- Active GoHighLevel account with access to the specific sub-account you want to connect.
- Admin or owner permissions inside that sub-account so you can manage settings and integrations.
- Live Stripe account (not just a test account) with your business details, bank account, and verification completed.
- Supported country and currency: Stripe isn’t available everywhere. Double-check that your country is supported on Stripe’s global availability page.
- One Stripe account per sub-account: each GoHighLevel sub-account can be connected to one Stripe account at a time. If you manage multiple brands, plan which Stripe account should be linked to which sub-account.
Once these are in place, you’re ready to connect.
Three ways to open the Stripe integration in GoHighLevel
Inside a GoHighLevel sub-account, there are three main paths that all lead to the same Stripe connection screen:
- Launchpad – ideal when you’re setting up a new account and following the onboarding checklist.
- Settings → Integrations – the most direct, “set it and forget it” path.
- Payments → Integrations – helpful when you’re already working in the payments area.
Here’s a simple visual of those paths:
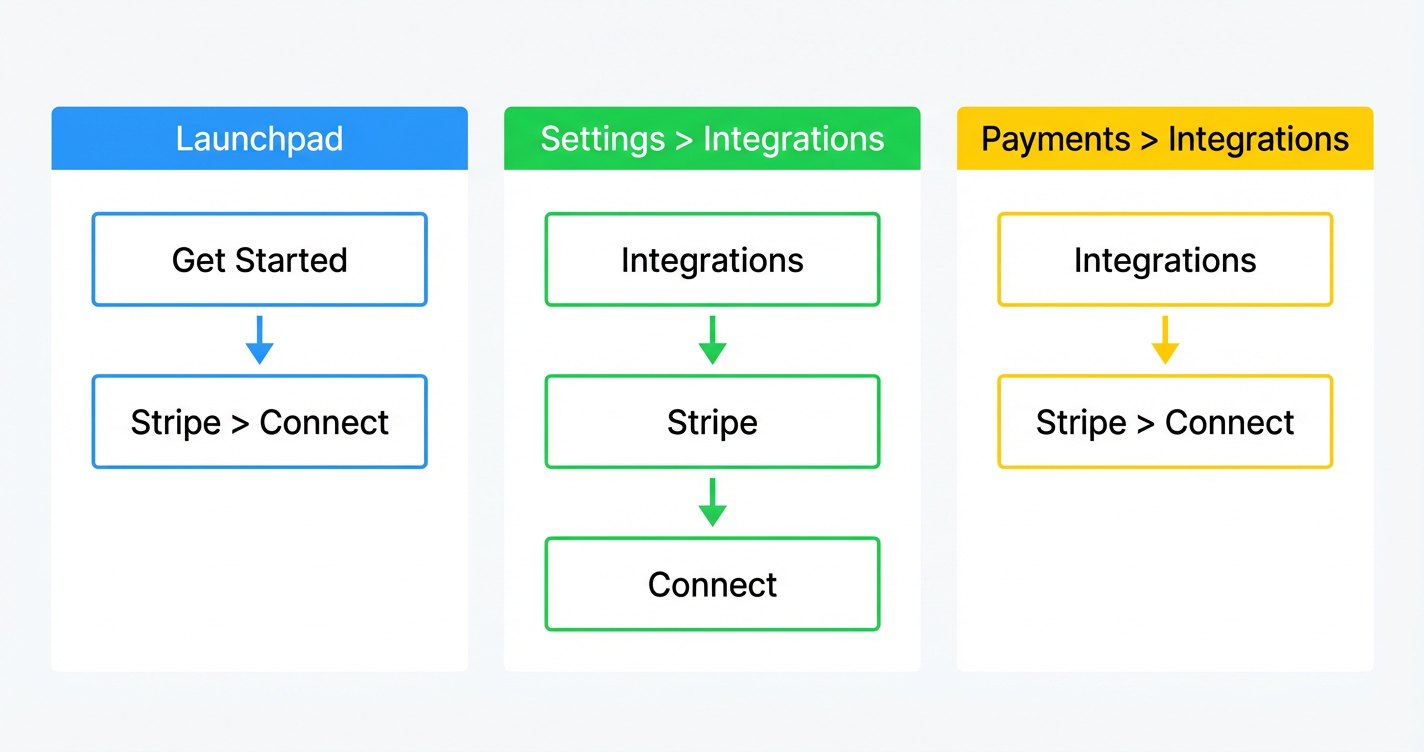
You only need to use one of these methods—the actual Stripe authorization flow is the same once you click through.
Method 1: Connect Stripe via Launchpad
Use this route if you’re setting up a brand‑new GoHighLevel sub-account and working through the onboarding checklist.
- Log into the correct sub-account. Make sure you’ve switched into the sub-account you want to connect (not the agency view).
- In the left-hand navigation, click Launchpad.
- In the Setup Guide, find the Ecommerce or payments section.
- Click Start Collecting Payments with Stripe.
- A Stripe connection window will open. Click the button to connect your Stripe account.

From here, you’ll be sent to Stripe’s secure authorization page (we’ll cover that flow in detail below).
Implementation tip: As soon as your Stripe connection is live, create a simple $1 test product or payment link in GoHighLevel so you can run a test transaction before sending real traffic.
If you’re just spinning up a new GoHighLevel account, you can start a free trial here and use Launchpad as your central setup checklist.
Method 2: Connect Stripe via Settings → Integrations
This path is perfect when you’re doing more back‑of‑house configuration or revisiting integrations later.
- In your GoHighLevel sub-account, click Settings (usually in the left sidebar near the bottom).
- Select Integrations.
- Find Stripe in the list of available integrations.
- Click Continue or Connect for Stripe.

- A Stripe authorization window opens—proceed with the login and approval steps.
Once you confirm access inside Stripe, you’ll be redirected back to GoHighLevel and should see Stripe listed as Connected.
Method 3: Connect Stripe via Payments → Integrations
If you’re already working inside invoices, products, or payment links, this route keeps you in context.
- In your GoHighLevel sub-account, go to Payments.
- Click the Integrations tab at the top of the Payments area.
- Locate Stripe and click Connect.
- When the Stripe window appears, continue to the secure Stripe authorization screen.

After you complete the authorization, refresh the Payments → Integrations tab to confirm that Stripe now shows as Connected.
Authorizing Stripe: what actually happens

No matter which navigation path you choose, the next step is the same: authorizing GoHighLevel inside Stripe.
Here’s what to expect:
- You’ll be redirected to a secure Stripe page in your browser.
- If you’re not already logged into Stripe, you’ll be asked to sign in.
- Stripe will display a screen describing that you’re connecting your account to GoHighLevel.
- You choose the Stripe account you want to connect (if you manage more than one).
- You review and approve the requested permissions.
- Stripe redirects you back to GoHighLevel when the connection is successful.
A few important notes:
- Only one Stripe account per sub-account. If a different Stripe account is already connected, you may need to disconnect it before linking a new one.
- Sub-account level connection. You are connecting Stripe to a specific GoHighLevel sub-account, not globally across your entire agency by default.
- Security & compliance. The connection uses Stripe’s OAuth flow, so your card data and balances remain managed by Stripe. GoHighLevel gets the access it needs to create charges, refunds, and payment objects tied to your funnels.
How to verify and test your Stripe connection

After authorizing Stripe, don’t assume everything is perfect—test it. A 5‑minute test now can save you from an embarrassing launch later.
-
Confirm the integration status.
- In GoHighLevel, go back to Settings → Integrations or Payments → Integrations.
- Ensure Stripe shows as Connected with no error messages.
-
Create a tiny test offer.
- Set up a simple product, payment link, or order form using a low test price (e.g. $1).
- Connect it to Stripe as the payment processor.
-
Run a real or test transaction.
- If your Stripe account is still in test mode, you can use Stripe’s test card numbers.
- Otherwise, run a small real transaction using your own card.
-
Check both sides.
- In GoHighLevel, confirm that the payment shows up on the relevant contact and in your payments view.
- In Stripe, verify that a corresponding payment record exists and is linked to the right account.
If that flow works, your Stripe connection is healthy and ready for real customers.
Troubleshooting common Stripe connection issues
If something doesn’t work on the first try, start with these quick checks:
1. Stripe account not fully activated
If your Stripe account is missing verification details (business information, bank account, identity checks), Stripe may block new connections or charges.
-
Log into Stripe directly and complete any required verification steps.
-
Once Stripe shows your account as fully active, return to GoHighLevel and try the connection again.
2. Unsupported country
Stripe doesn’t support every country. If your business is based in a non‑supported country, you may not be able to connect or process payments.
-
Review Stripe’s global availability to confirm support.
-
If Stripe is not available in your region, you may need an alternative processing strategy.
3. Wrong GoHighLevel account or sub-account
It’s easy to be logged into the agency view or the wrong sub-account when you try to connect Stripe.
-
Double‑check the account switcher in GoHighLevel and make sure you’re inside the correct sub-account.
-
Try the connection again from that sub-account’s Launchpad, Settings → Integrations, or Payments → Integrations.
4. Already connected to another Stripe account
Each sub-account can only be connected to one Stripe account at a time.
-
In GoHighLevel, open Settings → Integrations or Payments → Integrations and look for an existing Stripe connection.
-
If you need to switch Stripe accounts, disconnect the old one first, then walk through the connection steps again.
5. Browser or popup blockers
Stripe’s authorization often opens in a new window or popup.
-
Temporarily disable aggressive popup blockers or browser extensions.
-
Try using an incognito window or a different browser if the Stripe page doesn’t appear.
If you’ve run through these checks and things are still failing, it’s worth reaching out to GoHighLevel support or your Stripe support team with screenshots of the error.
Turning your Stripe connection into real revenue
Once Stripe is connected, you can do much more than just accept the occasional payment. Inside GoHighLevel, that integration unlocks:
- Payment links you can drop into emails, SMS, and chats.
- Checkout pages inside funnels and websites that sync payments with pipelines.
- Subscriptions for retainers, memberships, and ongoing services.
- Invoices that automatically log payment status back to your CRM.
- Course and program sales using GoHighLevel’s memberships and course features.
This is where strategy matters. A clean Stripe connection is the technical foundation; your offers, pricing, and automations are what turn it into scalable revenue.
If you want expert help designing that system, Revset Labs can:
-
Map out a payments-focused funnel strategy for your business or agency.
-
Implement GoHighLevel automations that follow up on abandoned checkouts and failed payments.
-
Build dashboards so you can track MRR, LTV, and ROI from your campaigns.
You bring the offer. We bring the AI‑powered automation and marketing strategy.
And if you’re still exploring GoHighLevel, now is the perfect time to start your free trial, connect Stripe, and see how it feels to manage leads and revenue in one place.
FAQ: Stripe + GoHighLevel sub-account
How long does it take to connect Stripe to a GoHighLevel sub-account?
If your Stripe account is already verified, the actual connection usually takes just a few minutes—most of the time is spent navigating to the integration and confirming access.
Can I connect more than one Stripe account to the same sub-account?
No. Each GoHighLevel sub-account can only be connected to one Stripe account at a time. If you need to switch, disconnect the existing Stripe account first, then connect the new one.
Will connecting Stripe affect my existing funnels or contacts?
The connection itself won’t change your funnels or contacts. It simply gives GoHighLevel permission to create and track payments. You still decide where and how to add checkout forms, payment links, and offers.
What should I do if the Stripe authorization window never appears?
Try disabling popup blockers, switching browsers, or using an incognito window. If the issue persists, reach out to GoHighLevel support and share any error messages you see.
Who can help me implement all of this?
If you’d rather not stitch everything together yourself, Revset Labs can help you design and build a Stripe‑powered GoHighLevel setup—from funnels and automations to analytics and reporting.