 GoHighLevel (Step-by-Step Guide)”>
Pipelines and opportunities are where revenue lives in GoHighLevel. When they’re set up well, you always know exactly where every deal is, what needs to happen next, and which campaigns are actually turning leads into cash.
This guide shows you how to set up a simple, scalable sales pipeline in GoHighLevel, turn contacts into trackable opportunities, and use automation so your team spends more time closing and less time chasing spreadsheets.
Why pipelines and opportunities matter in GoHighLevel
In GoHighLevel, contacts are people or companies, while opportunities are the deals attached to them. A pipeline is the visual board that shows where each opportunity sits in your sales process.
When you get this right, you can:
- See your revenue forecast at a glance.
- Spot bottlenecks (for example, lots of deals stuck at "Proposal Sent").
- Route leads to the right reps or follow-up automations.
- Report on what’s actually working across funnels, ads, and campaigns.
If you don’t have GoHighLevel yet and you’re serious about systemizing your sales, start with a free trial here: Start your GoHighLevel free trial.
Step 1: Design and create your GoHighLevel sales pipeline
Before you click anything, map out the real stages your leads move through. Keep it simple enough for your team to actually use.
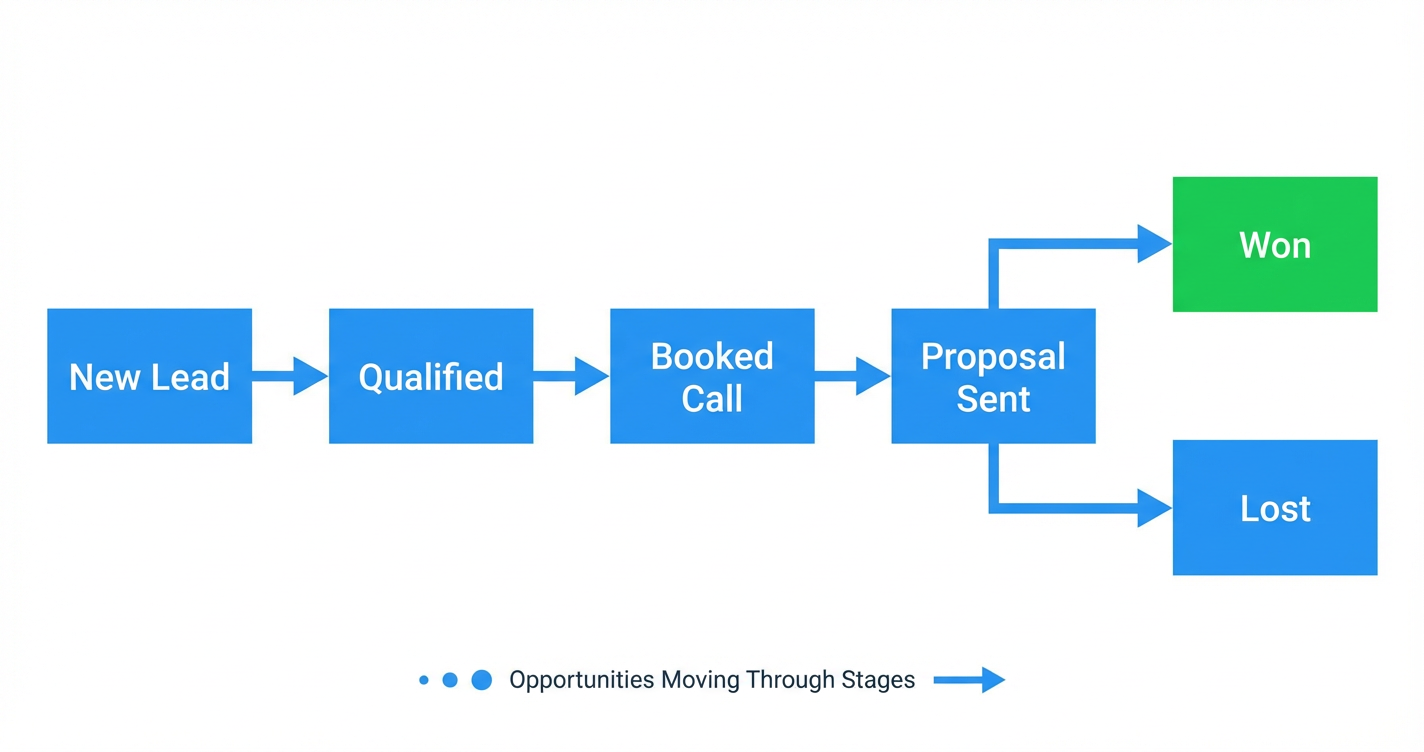
A common starter pipeline for agencies, local businesses, and B2B teams looks like this:
- New Lead – someone just opted in, called, or messaged.
- Qualified – you’ve confirmed they’re a fit.
- Booked Call – a discovery or strategy call is scheduled.
- Proposal Sent – pricing or scope has been sent.
- Closed Won – the deal is won and payment is in.
- Closed Lost – not moving forward (for now).
You can visualize this flow with a simple opportunity journey:
 GoHighLevel pipeline flow”>
Once you’re happy with the stages, create the pipeline in GoHighLevel:
- Go to Opportunities in the left-hand menu.
- Click Pipelines at the top.
- Click Create New Pipeline.
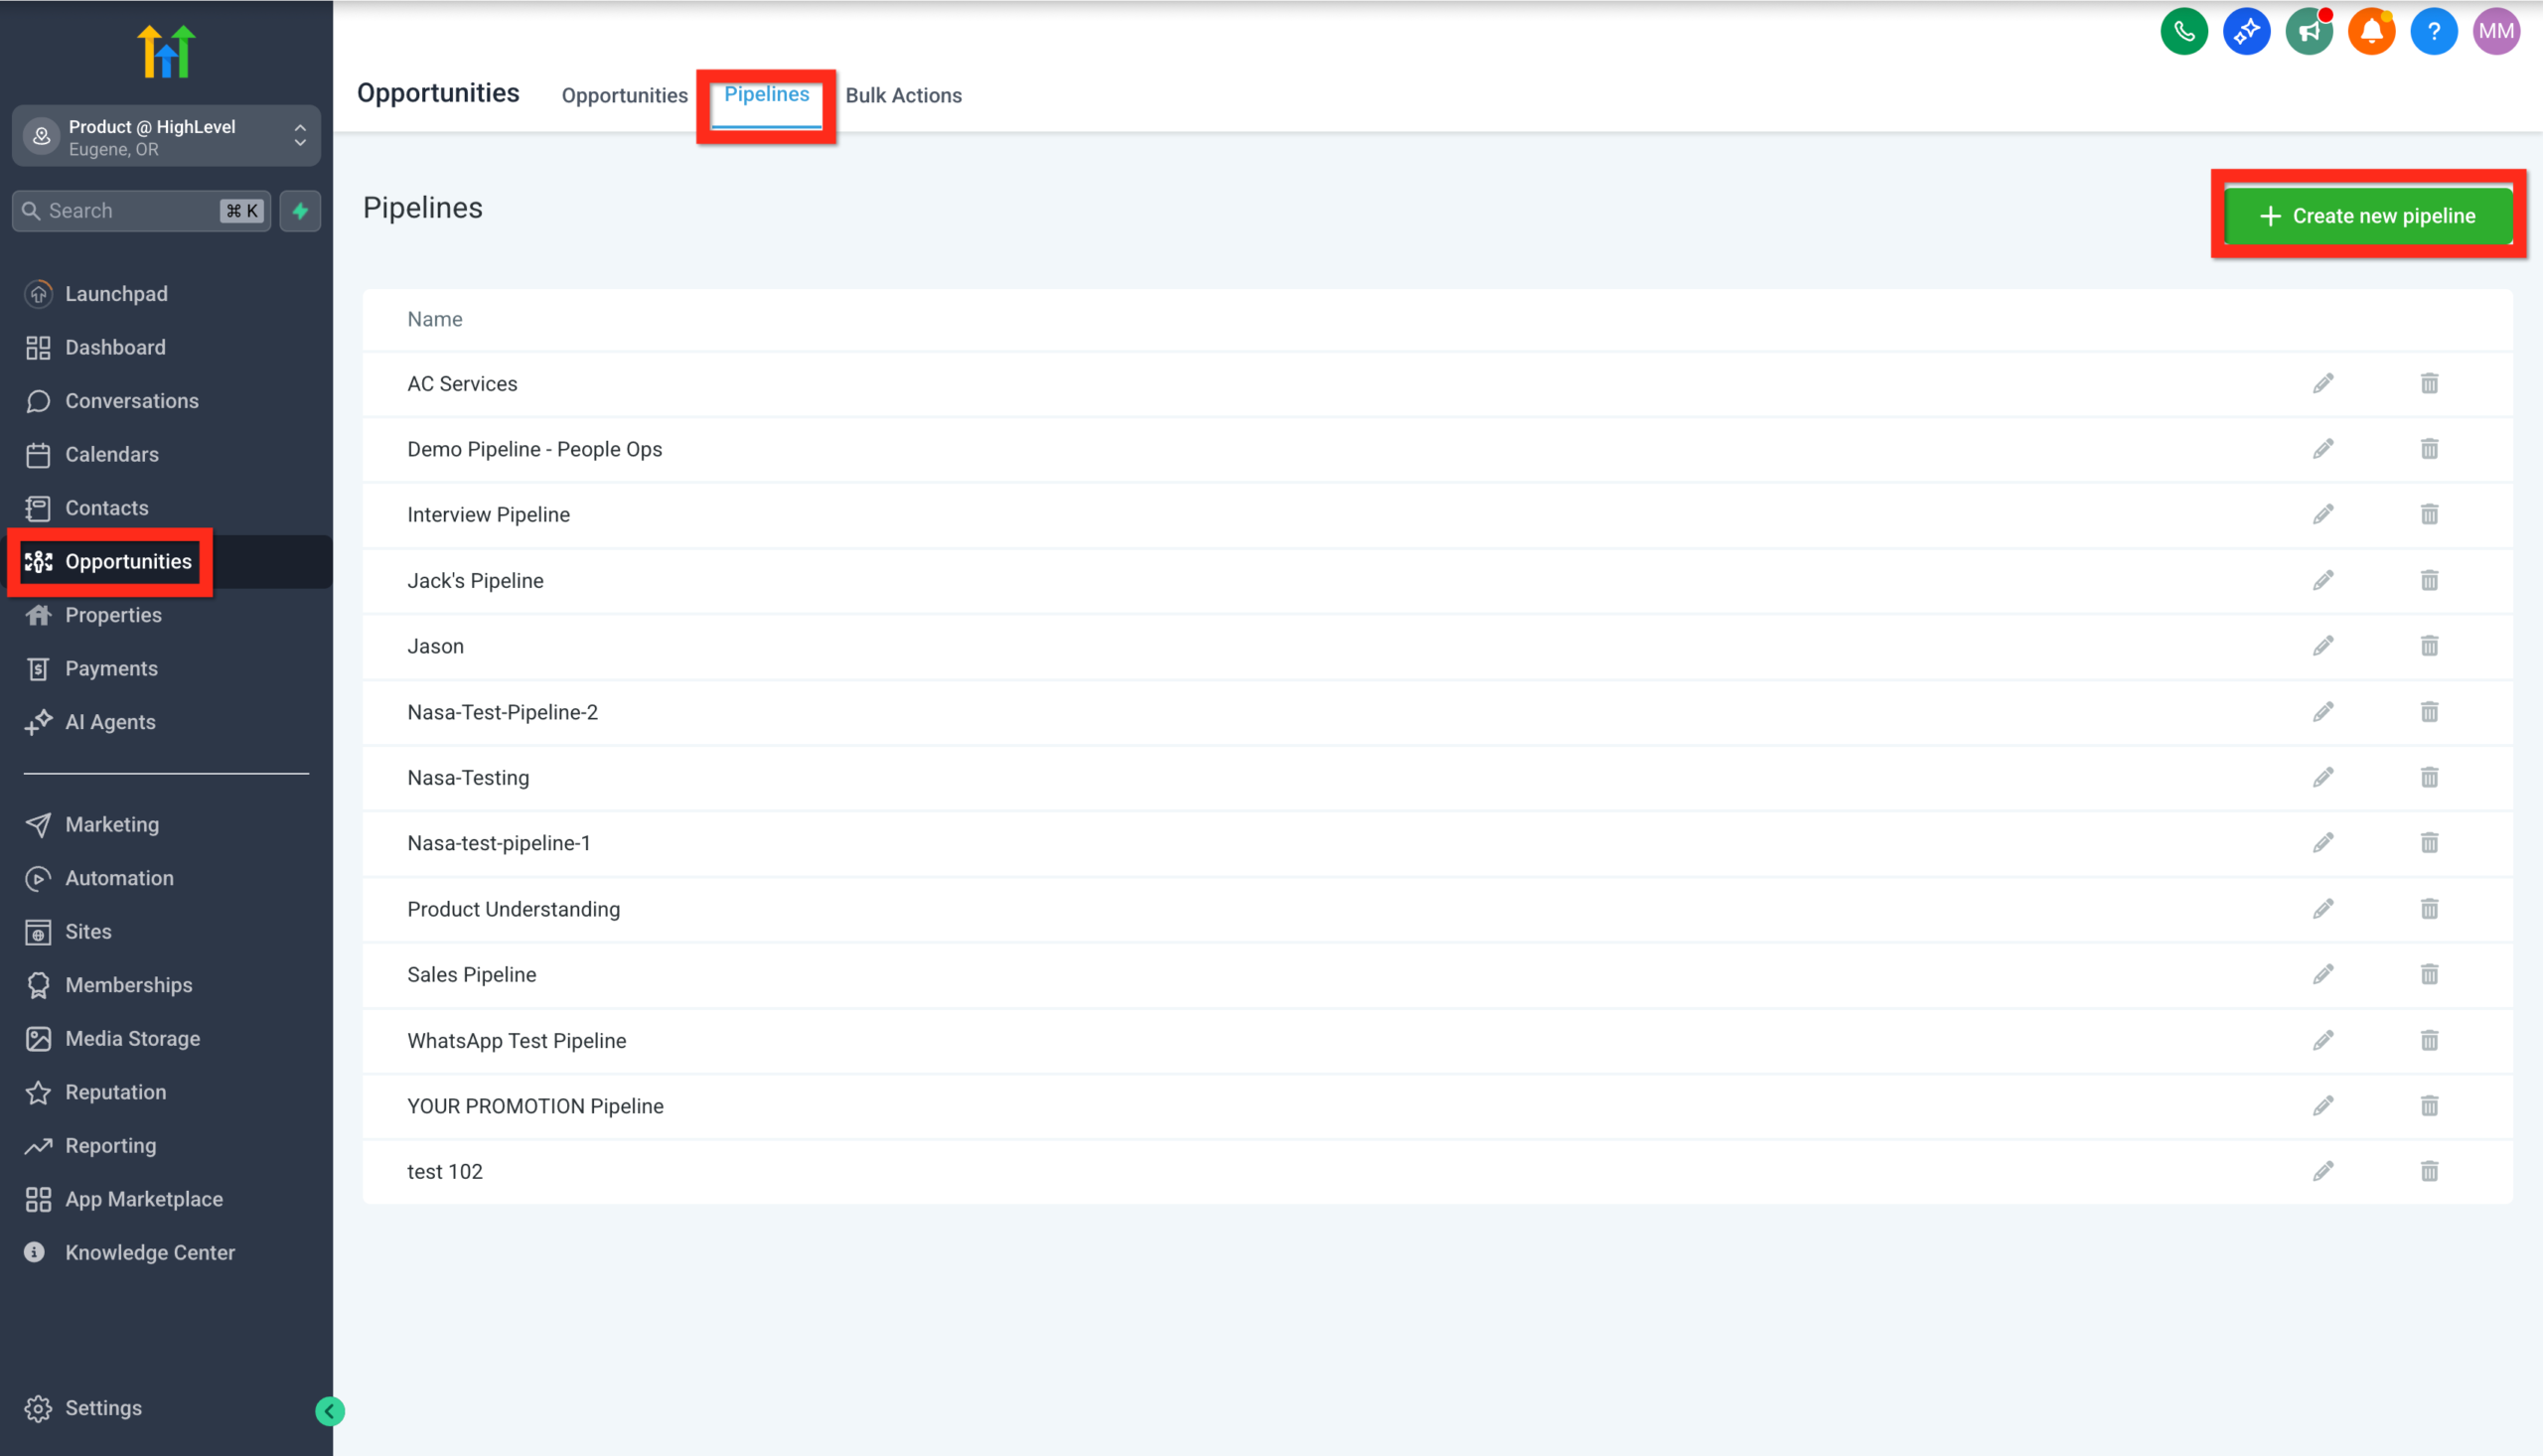 GoHighLevel Opportunities section.” title=”Create New Pipeline Button”>
 - Name your pipeline (for example, "Main Sales Pipeline").
- Add your stages in order: New Lead → Qualified → Booked Call → Proposal Sent → Closed Won / Closed Lost.
- Click Save.
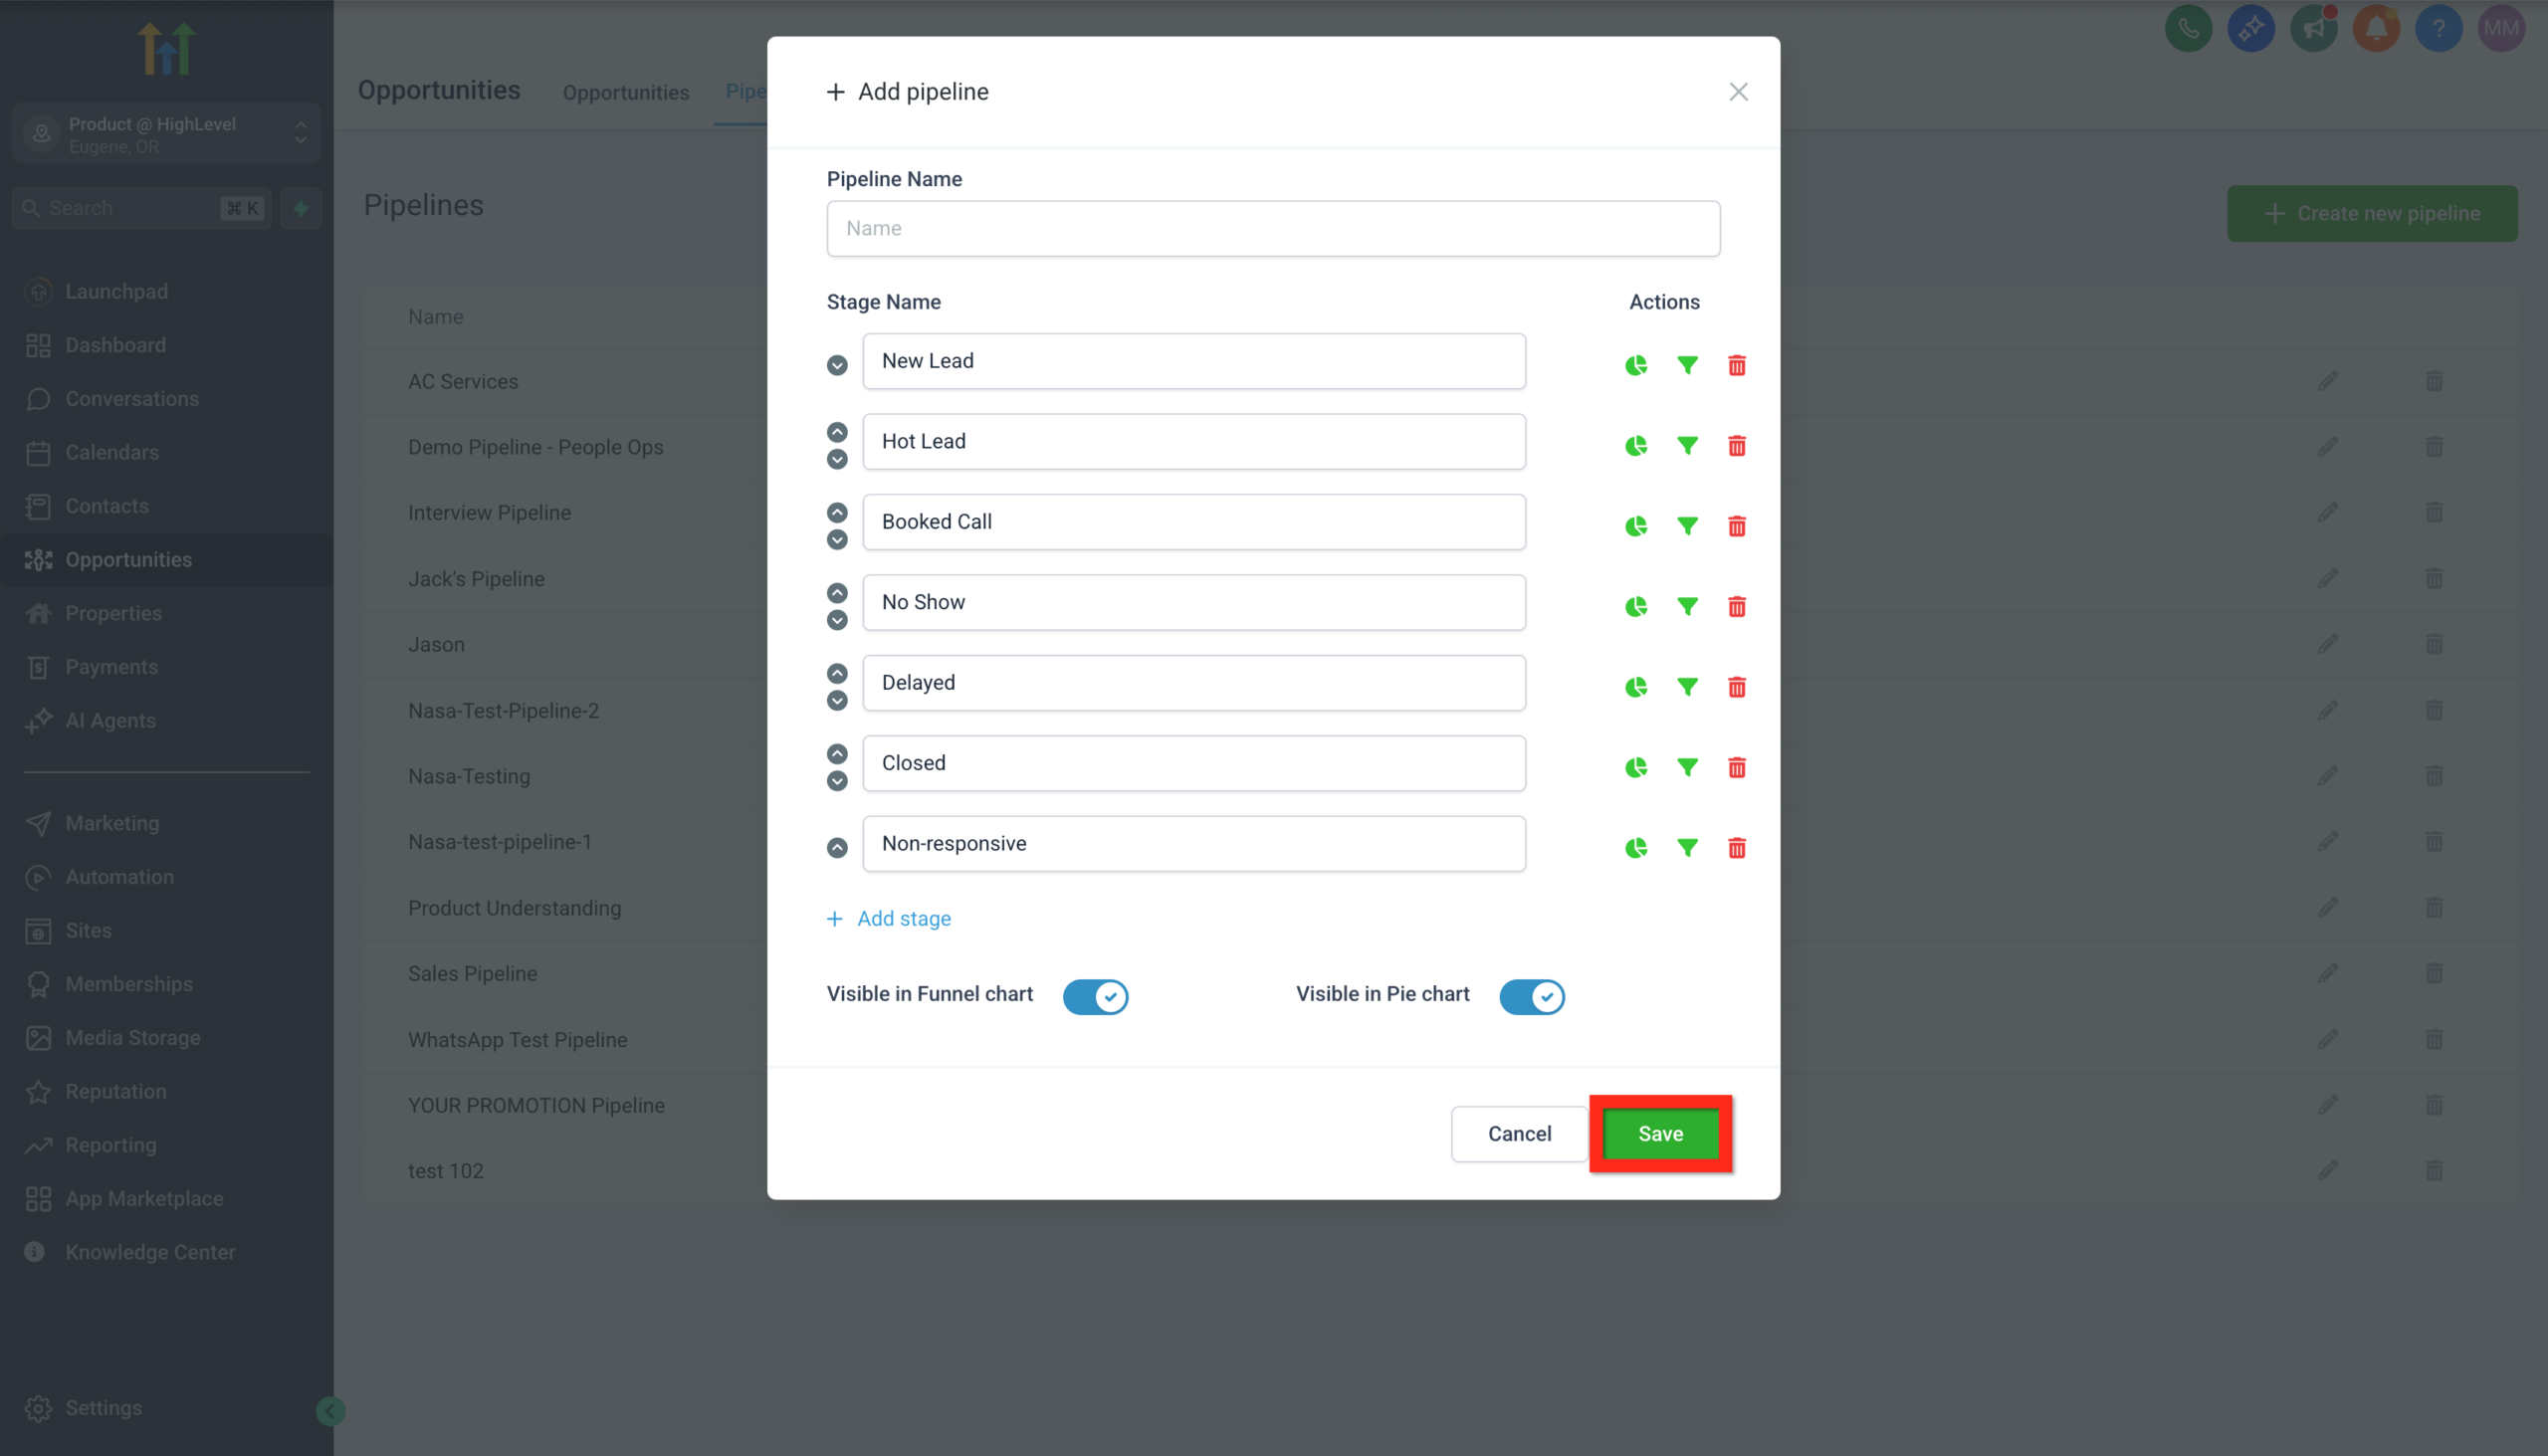 GoHighLevel 'Create New Pipeline' modal, showing fields for pipeline name and stage configuration, with the 'Save' button highlighted.” title=”Configure Pipeline Stages”>
Pro tip: Start with fewer stages and add more only when the team consistently uses the board. A pipeline that’s used beats a perfect pipeline nobody updates.
Whenever you’re building a new GoHighLevel account from scratch, this pipeline setup usually comes right after you’ve created your contacts. If you haven’t tackled that yet, check out our guide on creating and managing contacts in GoHighLevel.
Step 2: Import contacts as opportunities
Chances are you’re not starting from zero—you’ve got leads sitting in spreadsheets, another CRM, or an email marketing tool. You can import those contacts into GoHighLevel and instantly turn them into opportunities in your new pipeline.
Here’s the high-level process:
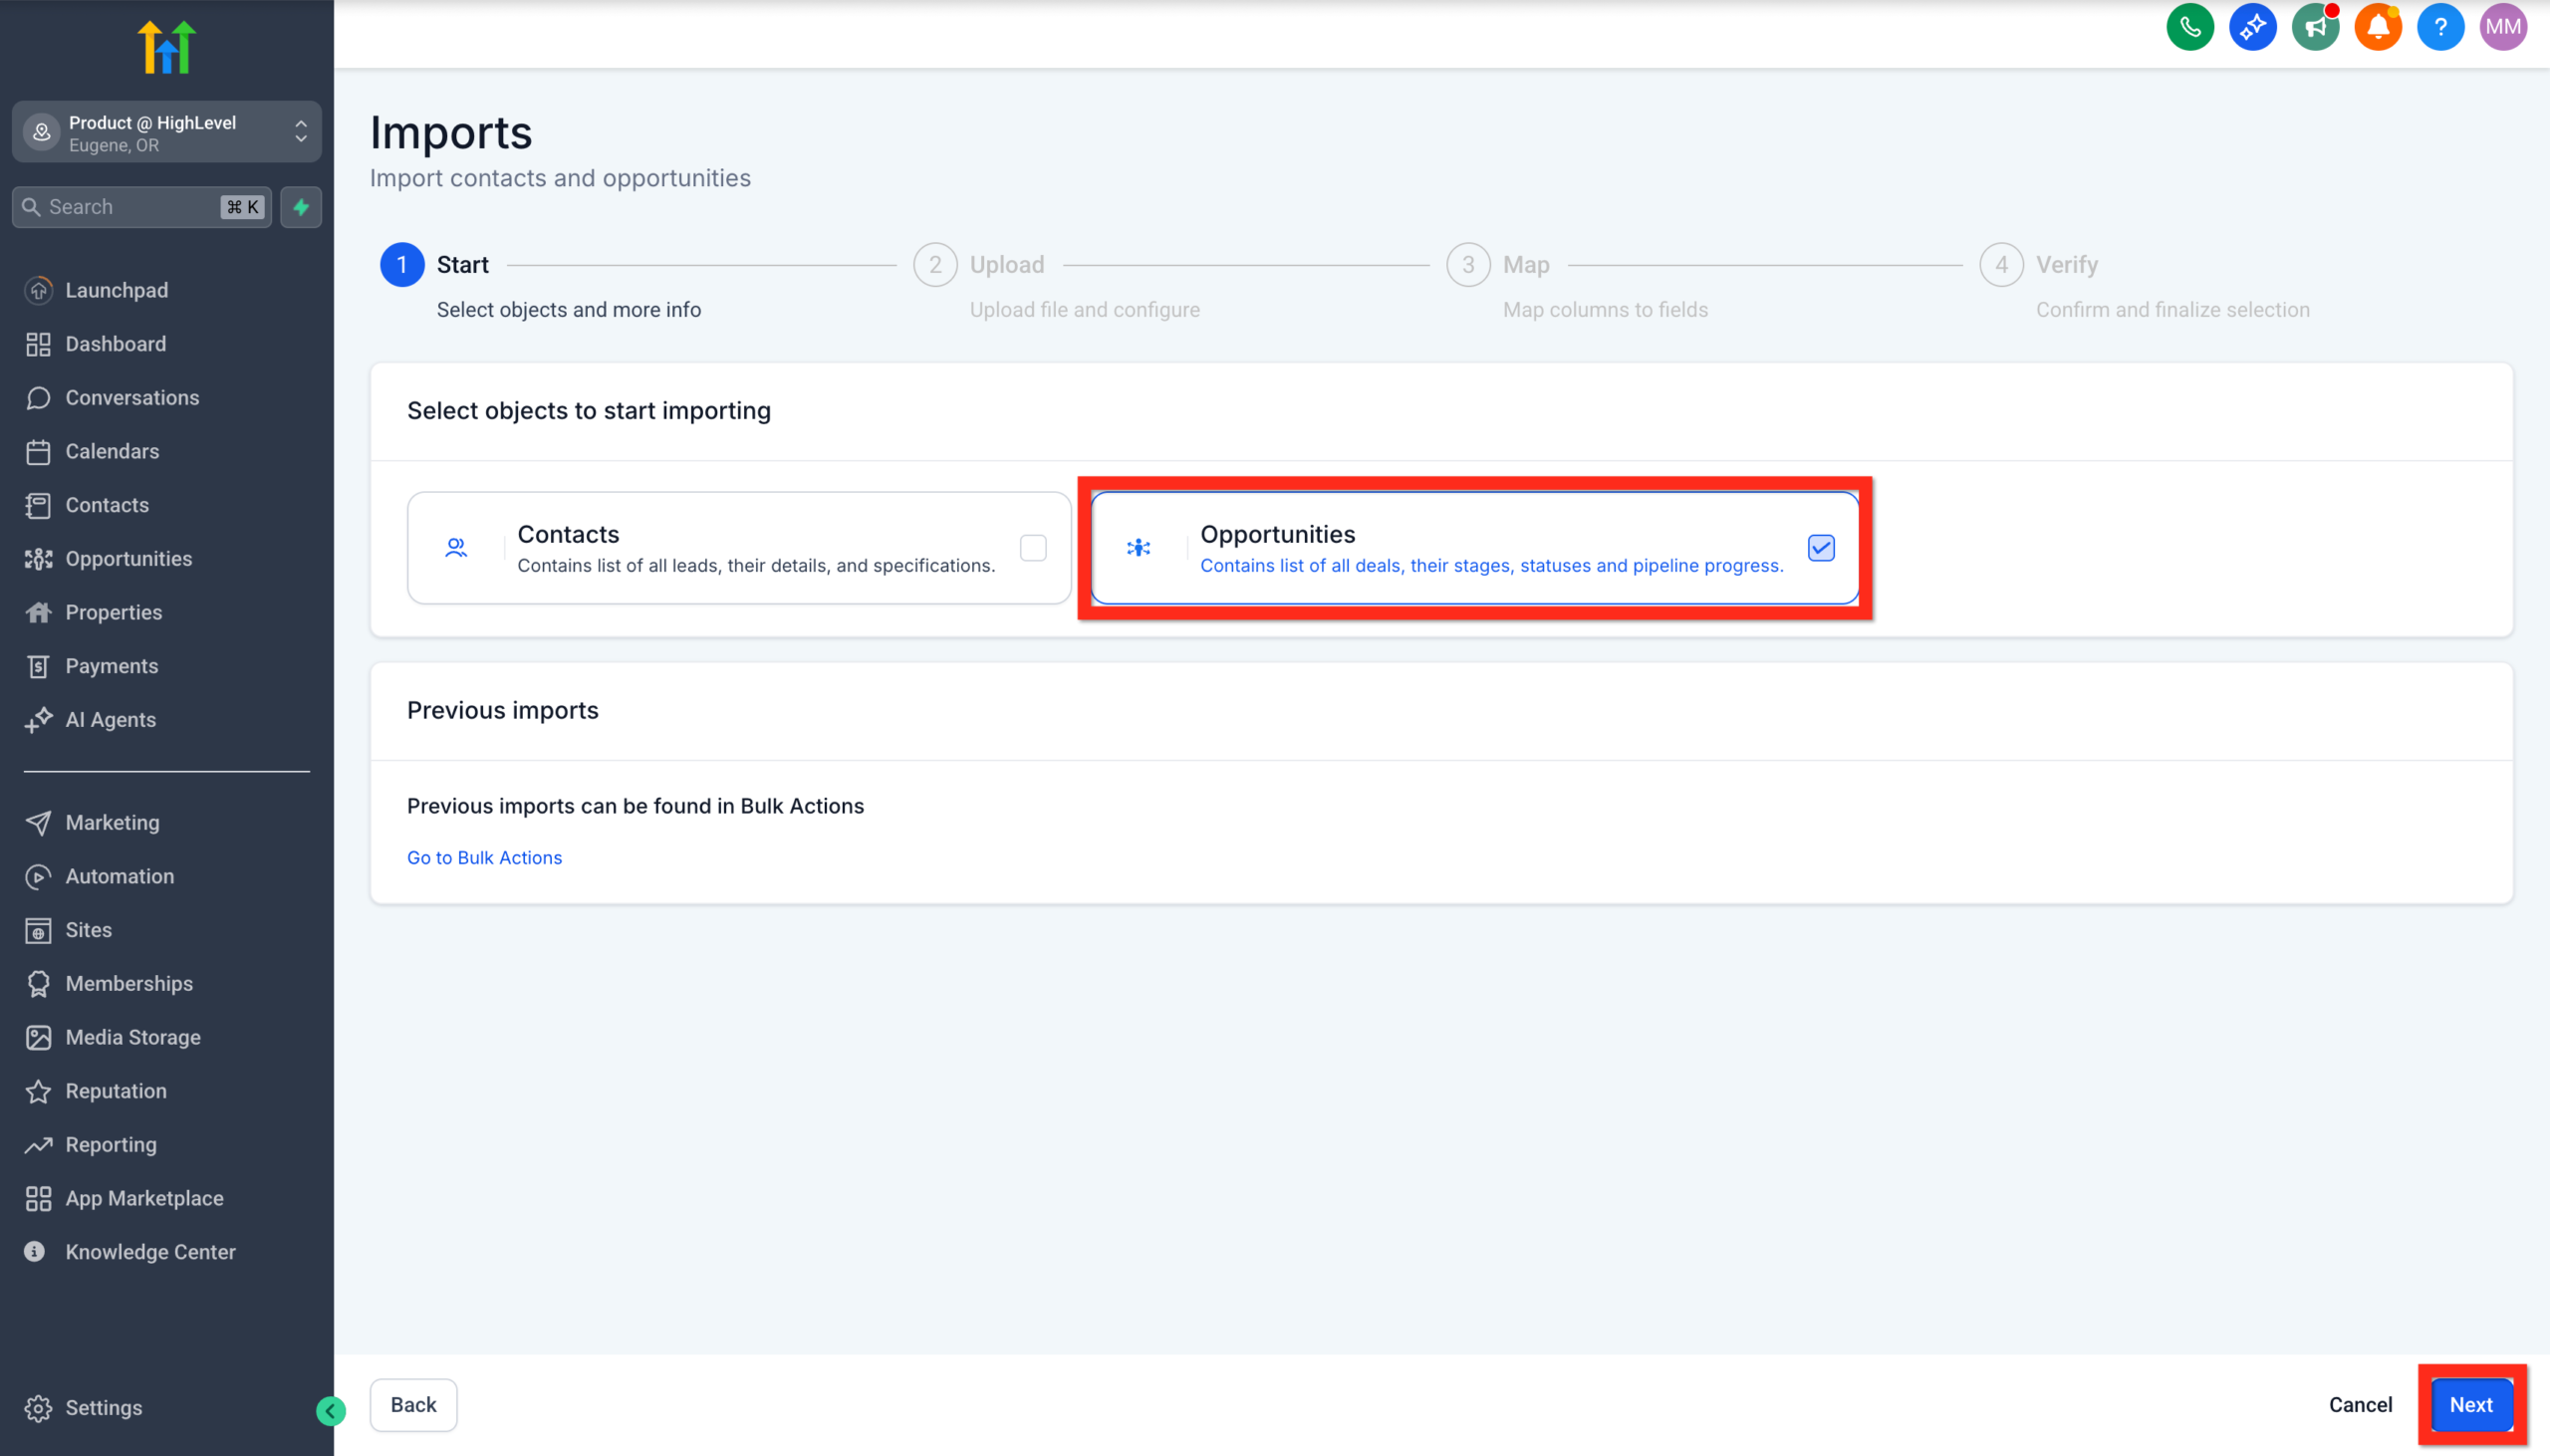
- Go to Opportunities.
- Click Import.
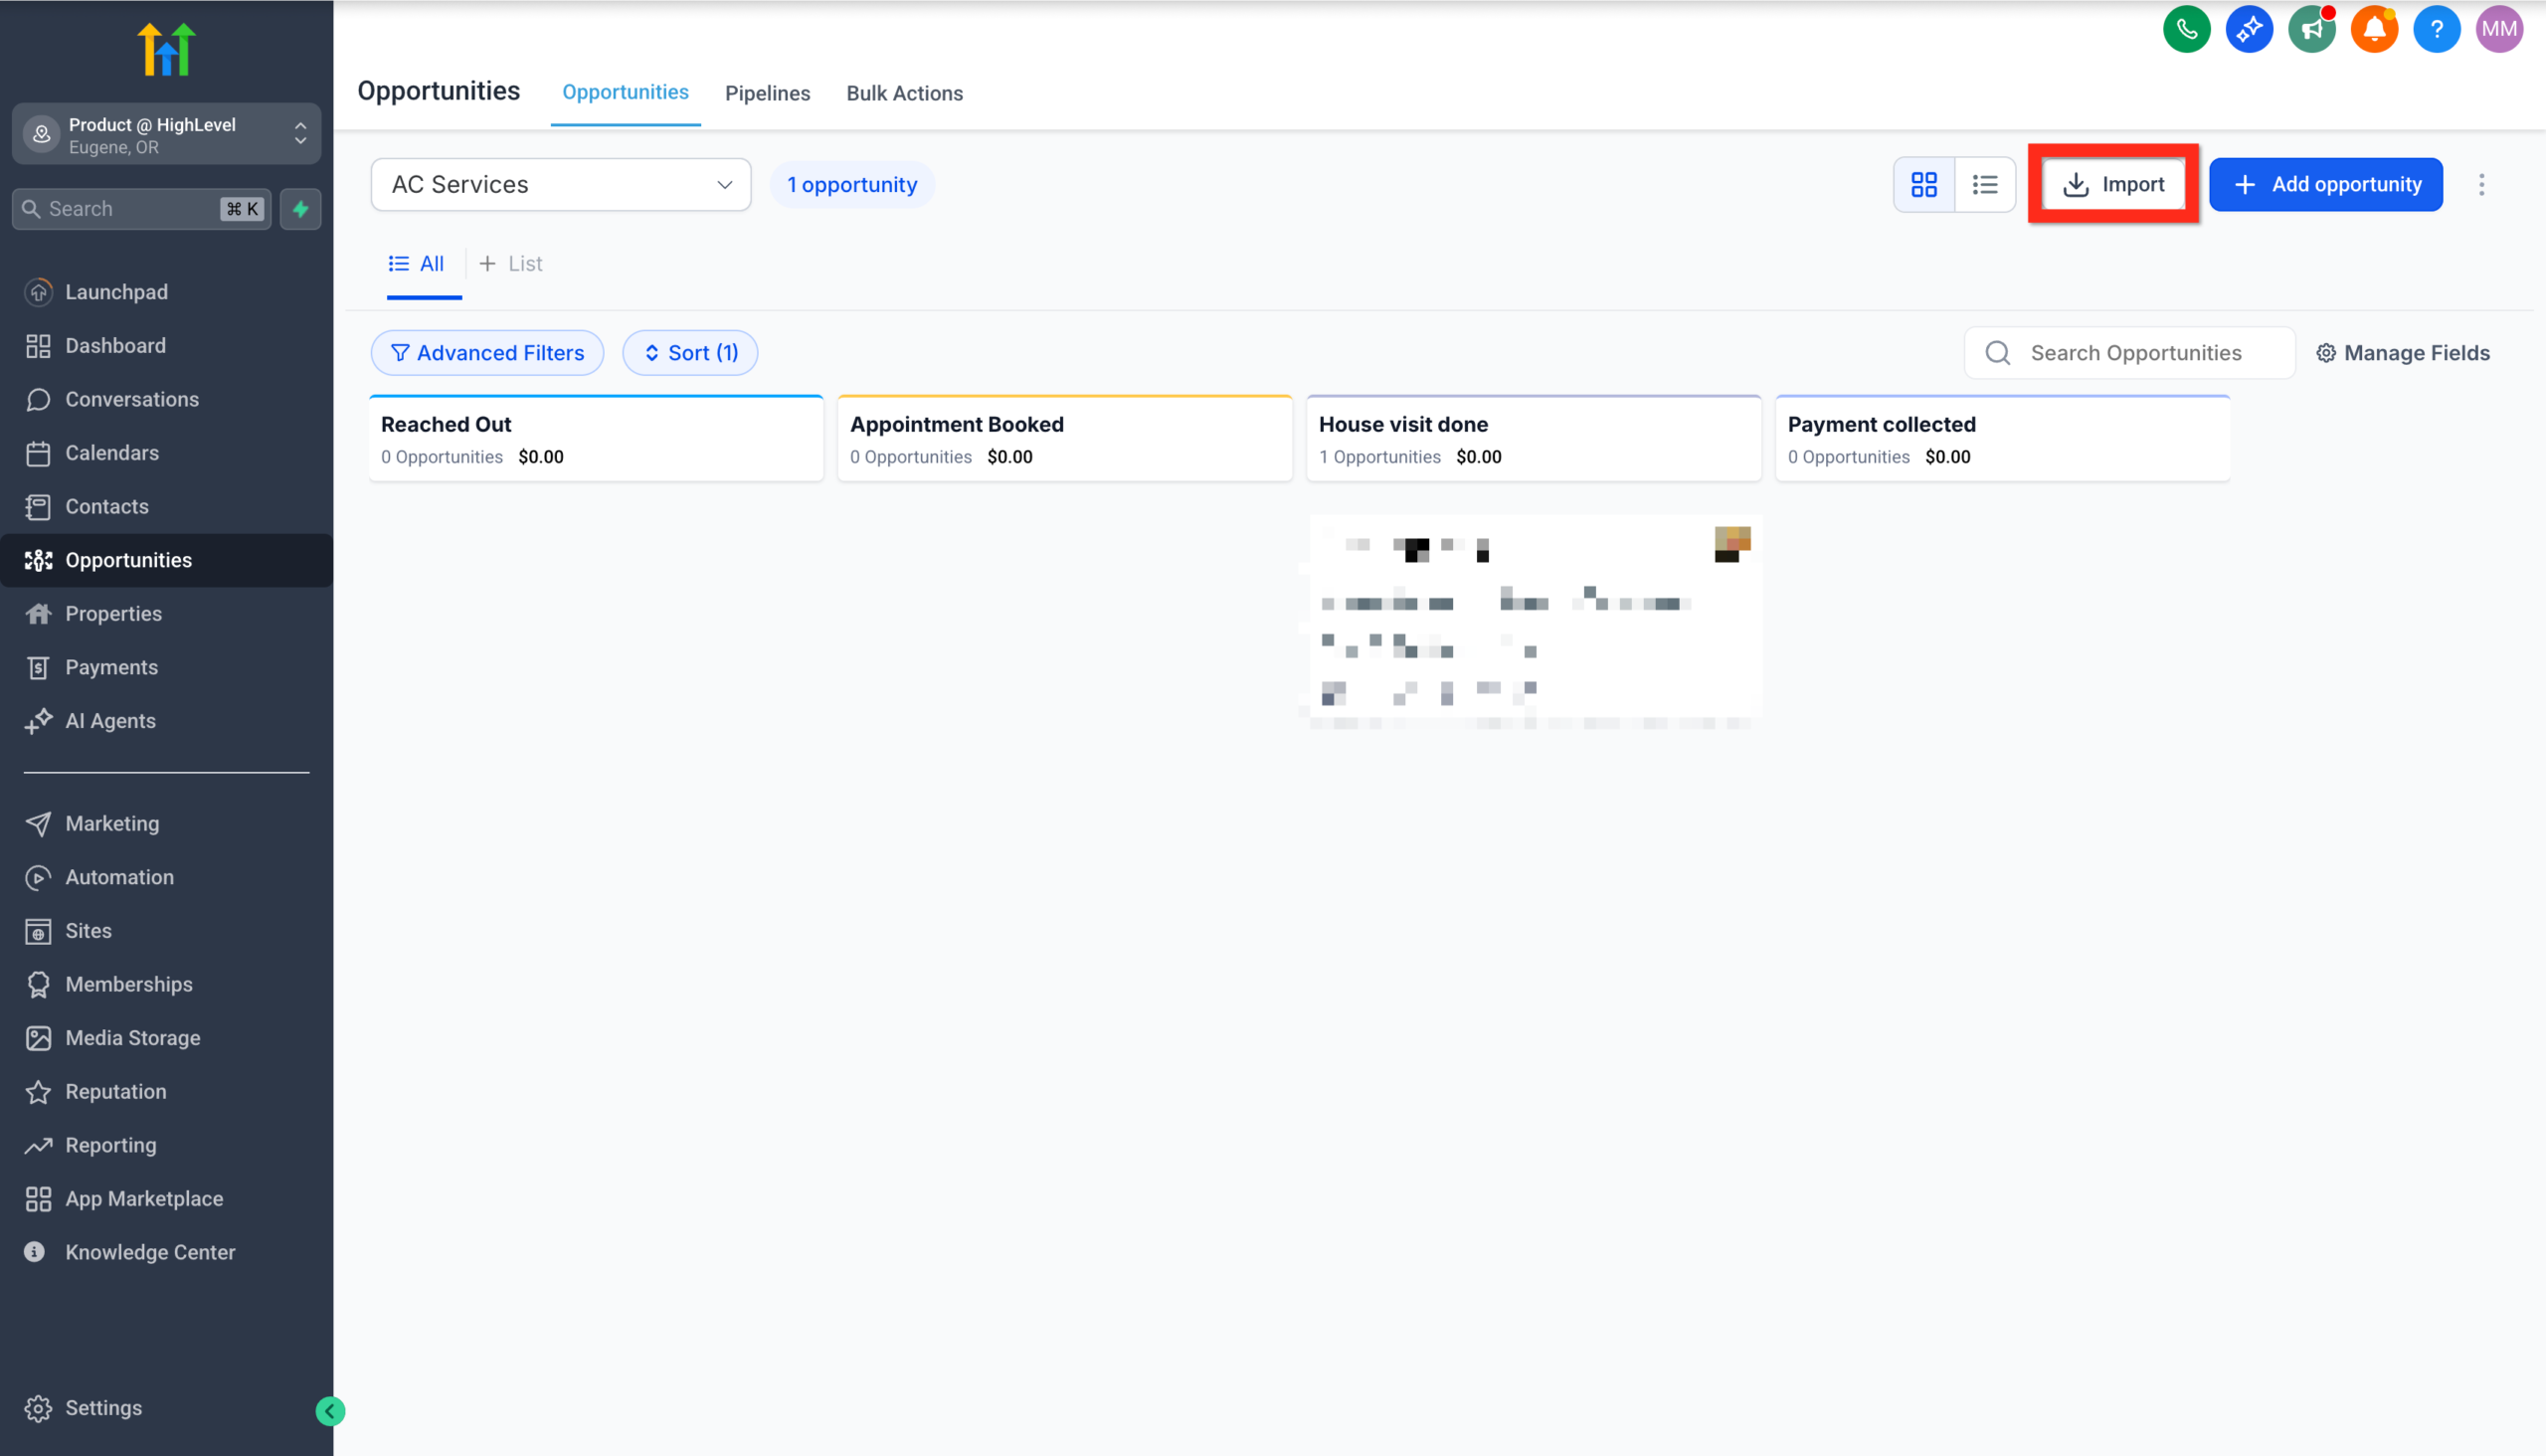 GoHighLevel Opportunities dashboard.” title=”GoHighLevel Import Button”>
 - Choose Opportunities as the import type.
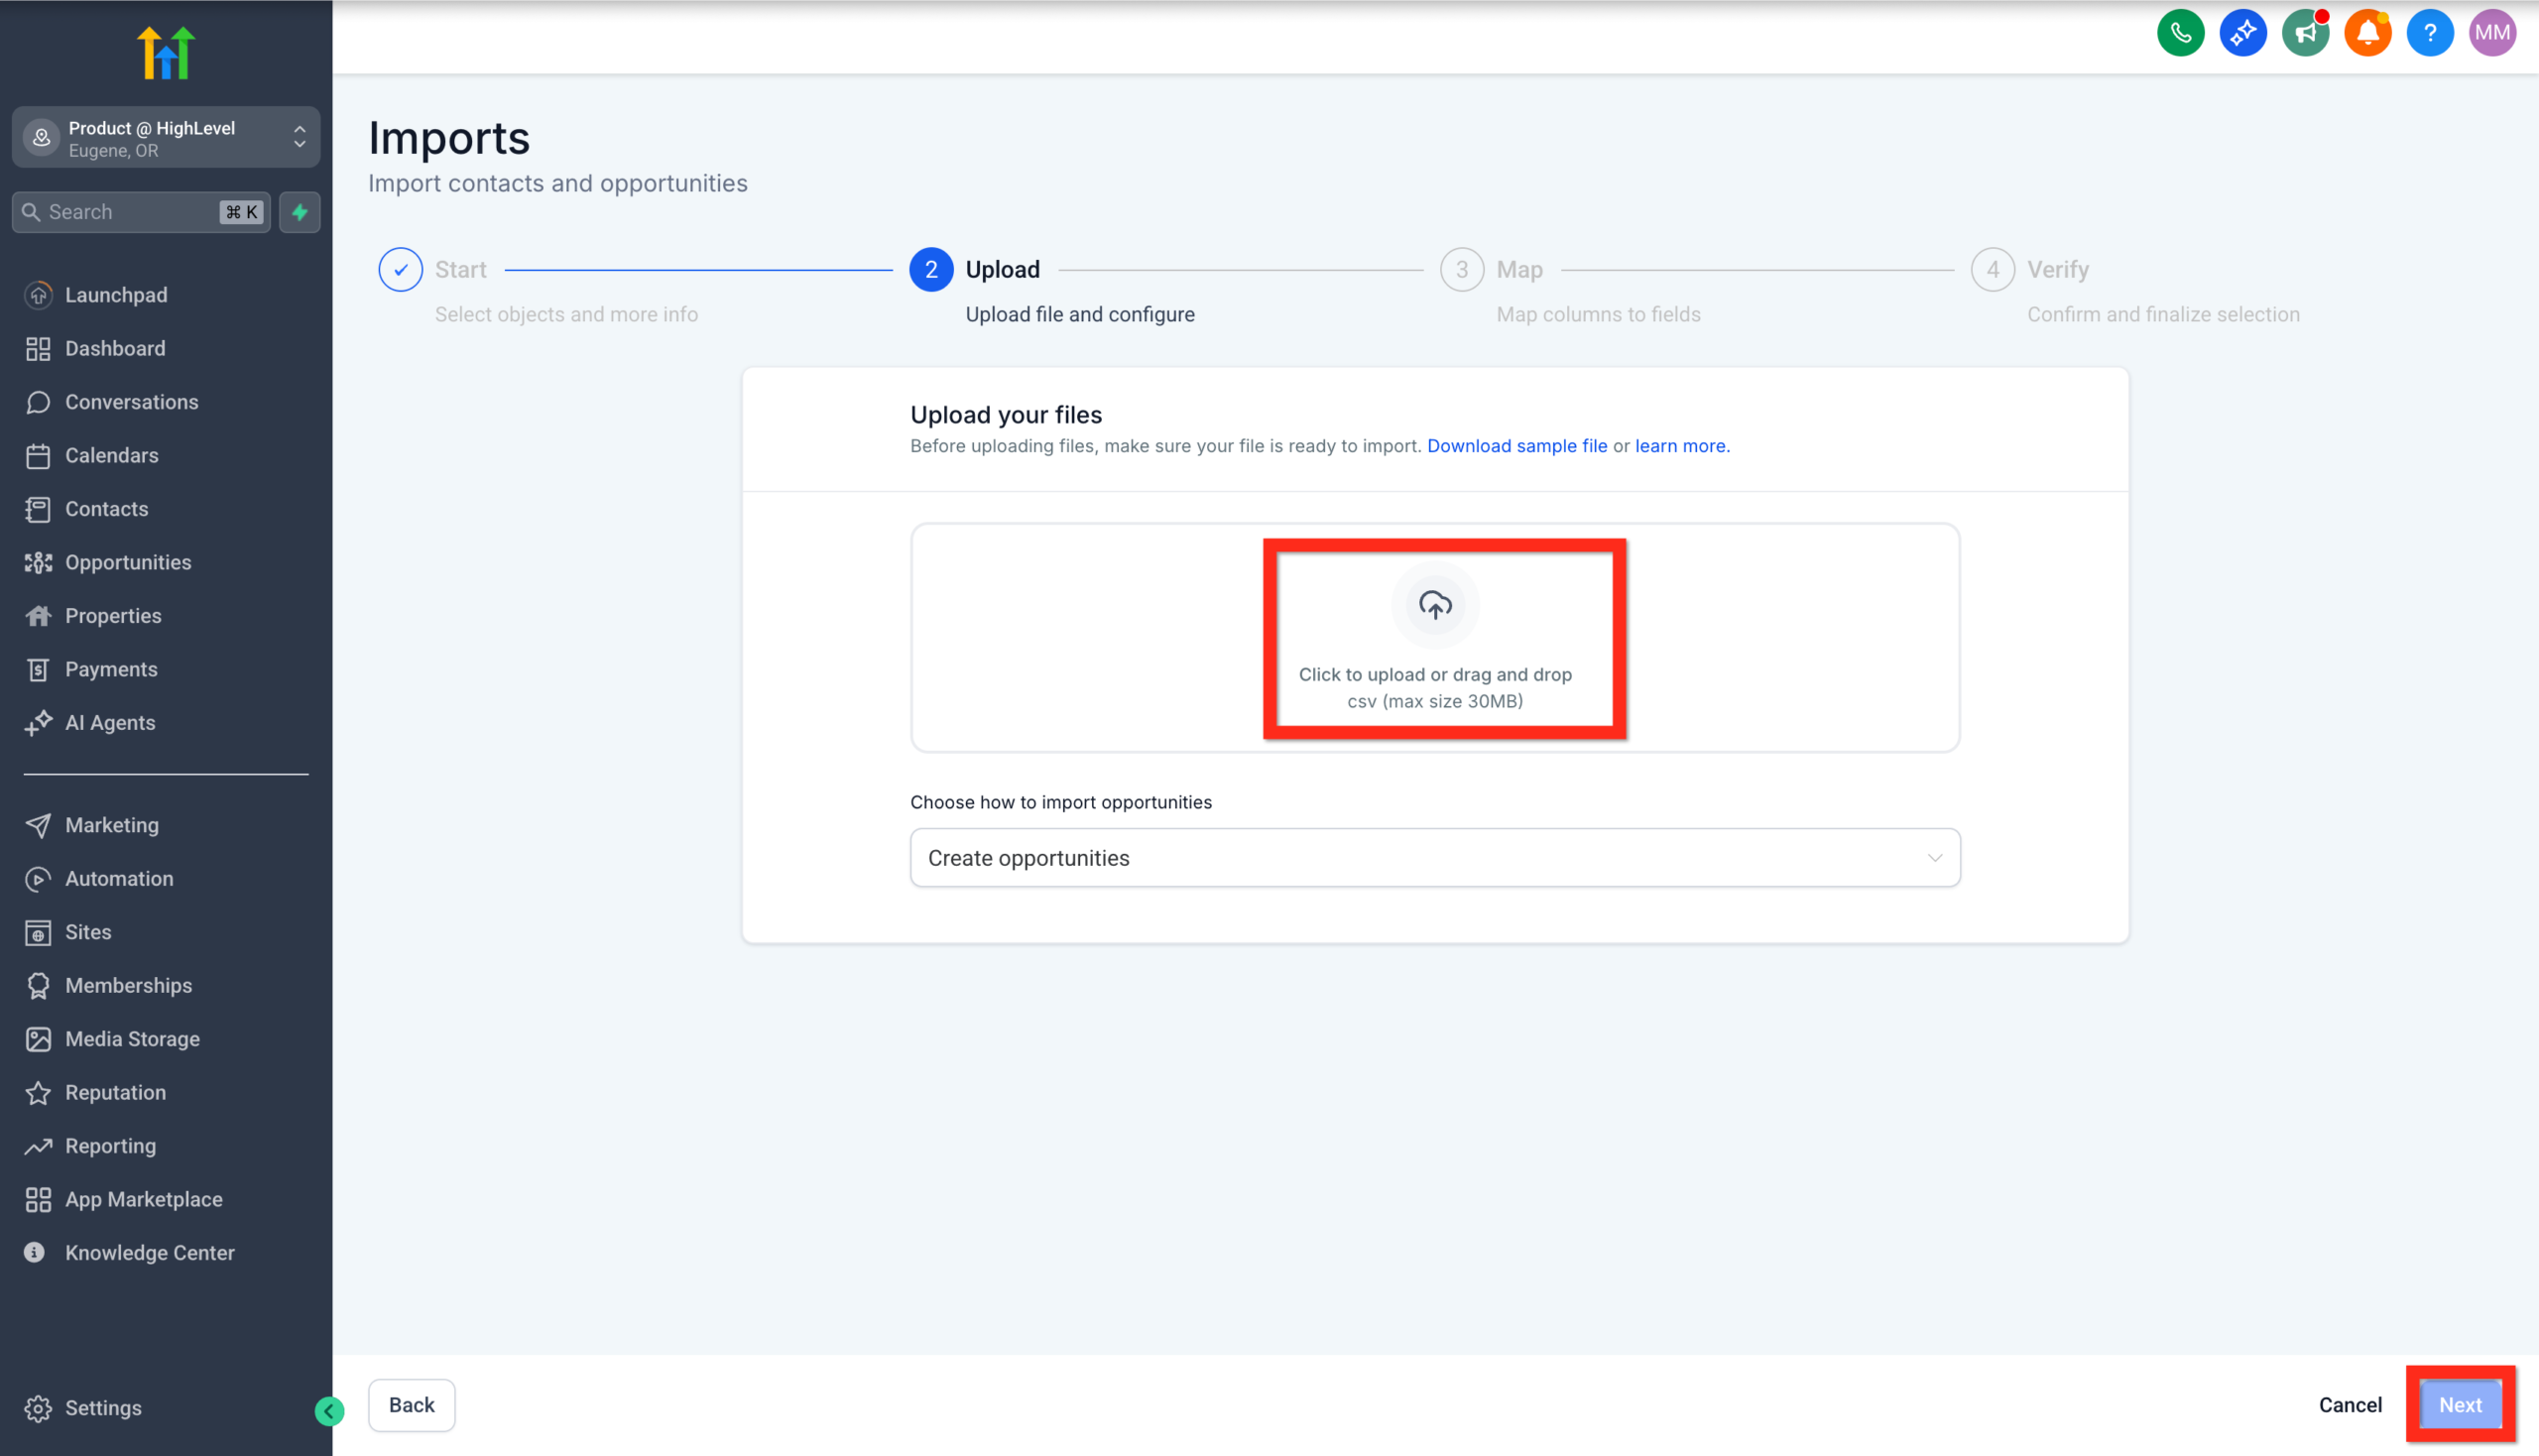
- Click Next and upload your CSV file.
 GoHighLevel import wizard, showing 'Opportunities' selected as the import type and the 'Next' button highlighted.” title=”Select Opportunities Import Type”>
 GoHighLevel import wizard, displaying the uploaded CSV file ready for mapping and the 'Next' button highlighted.” title=”Upload CSV File for Import”>
 - Map your CSV columns to GoHighLevel fields (Contact, Opportunity Name, Pipeline, Stage, Value, etc.).
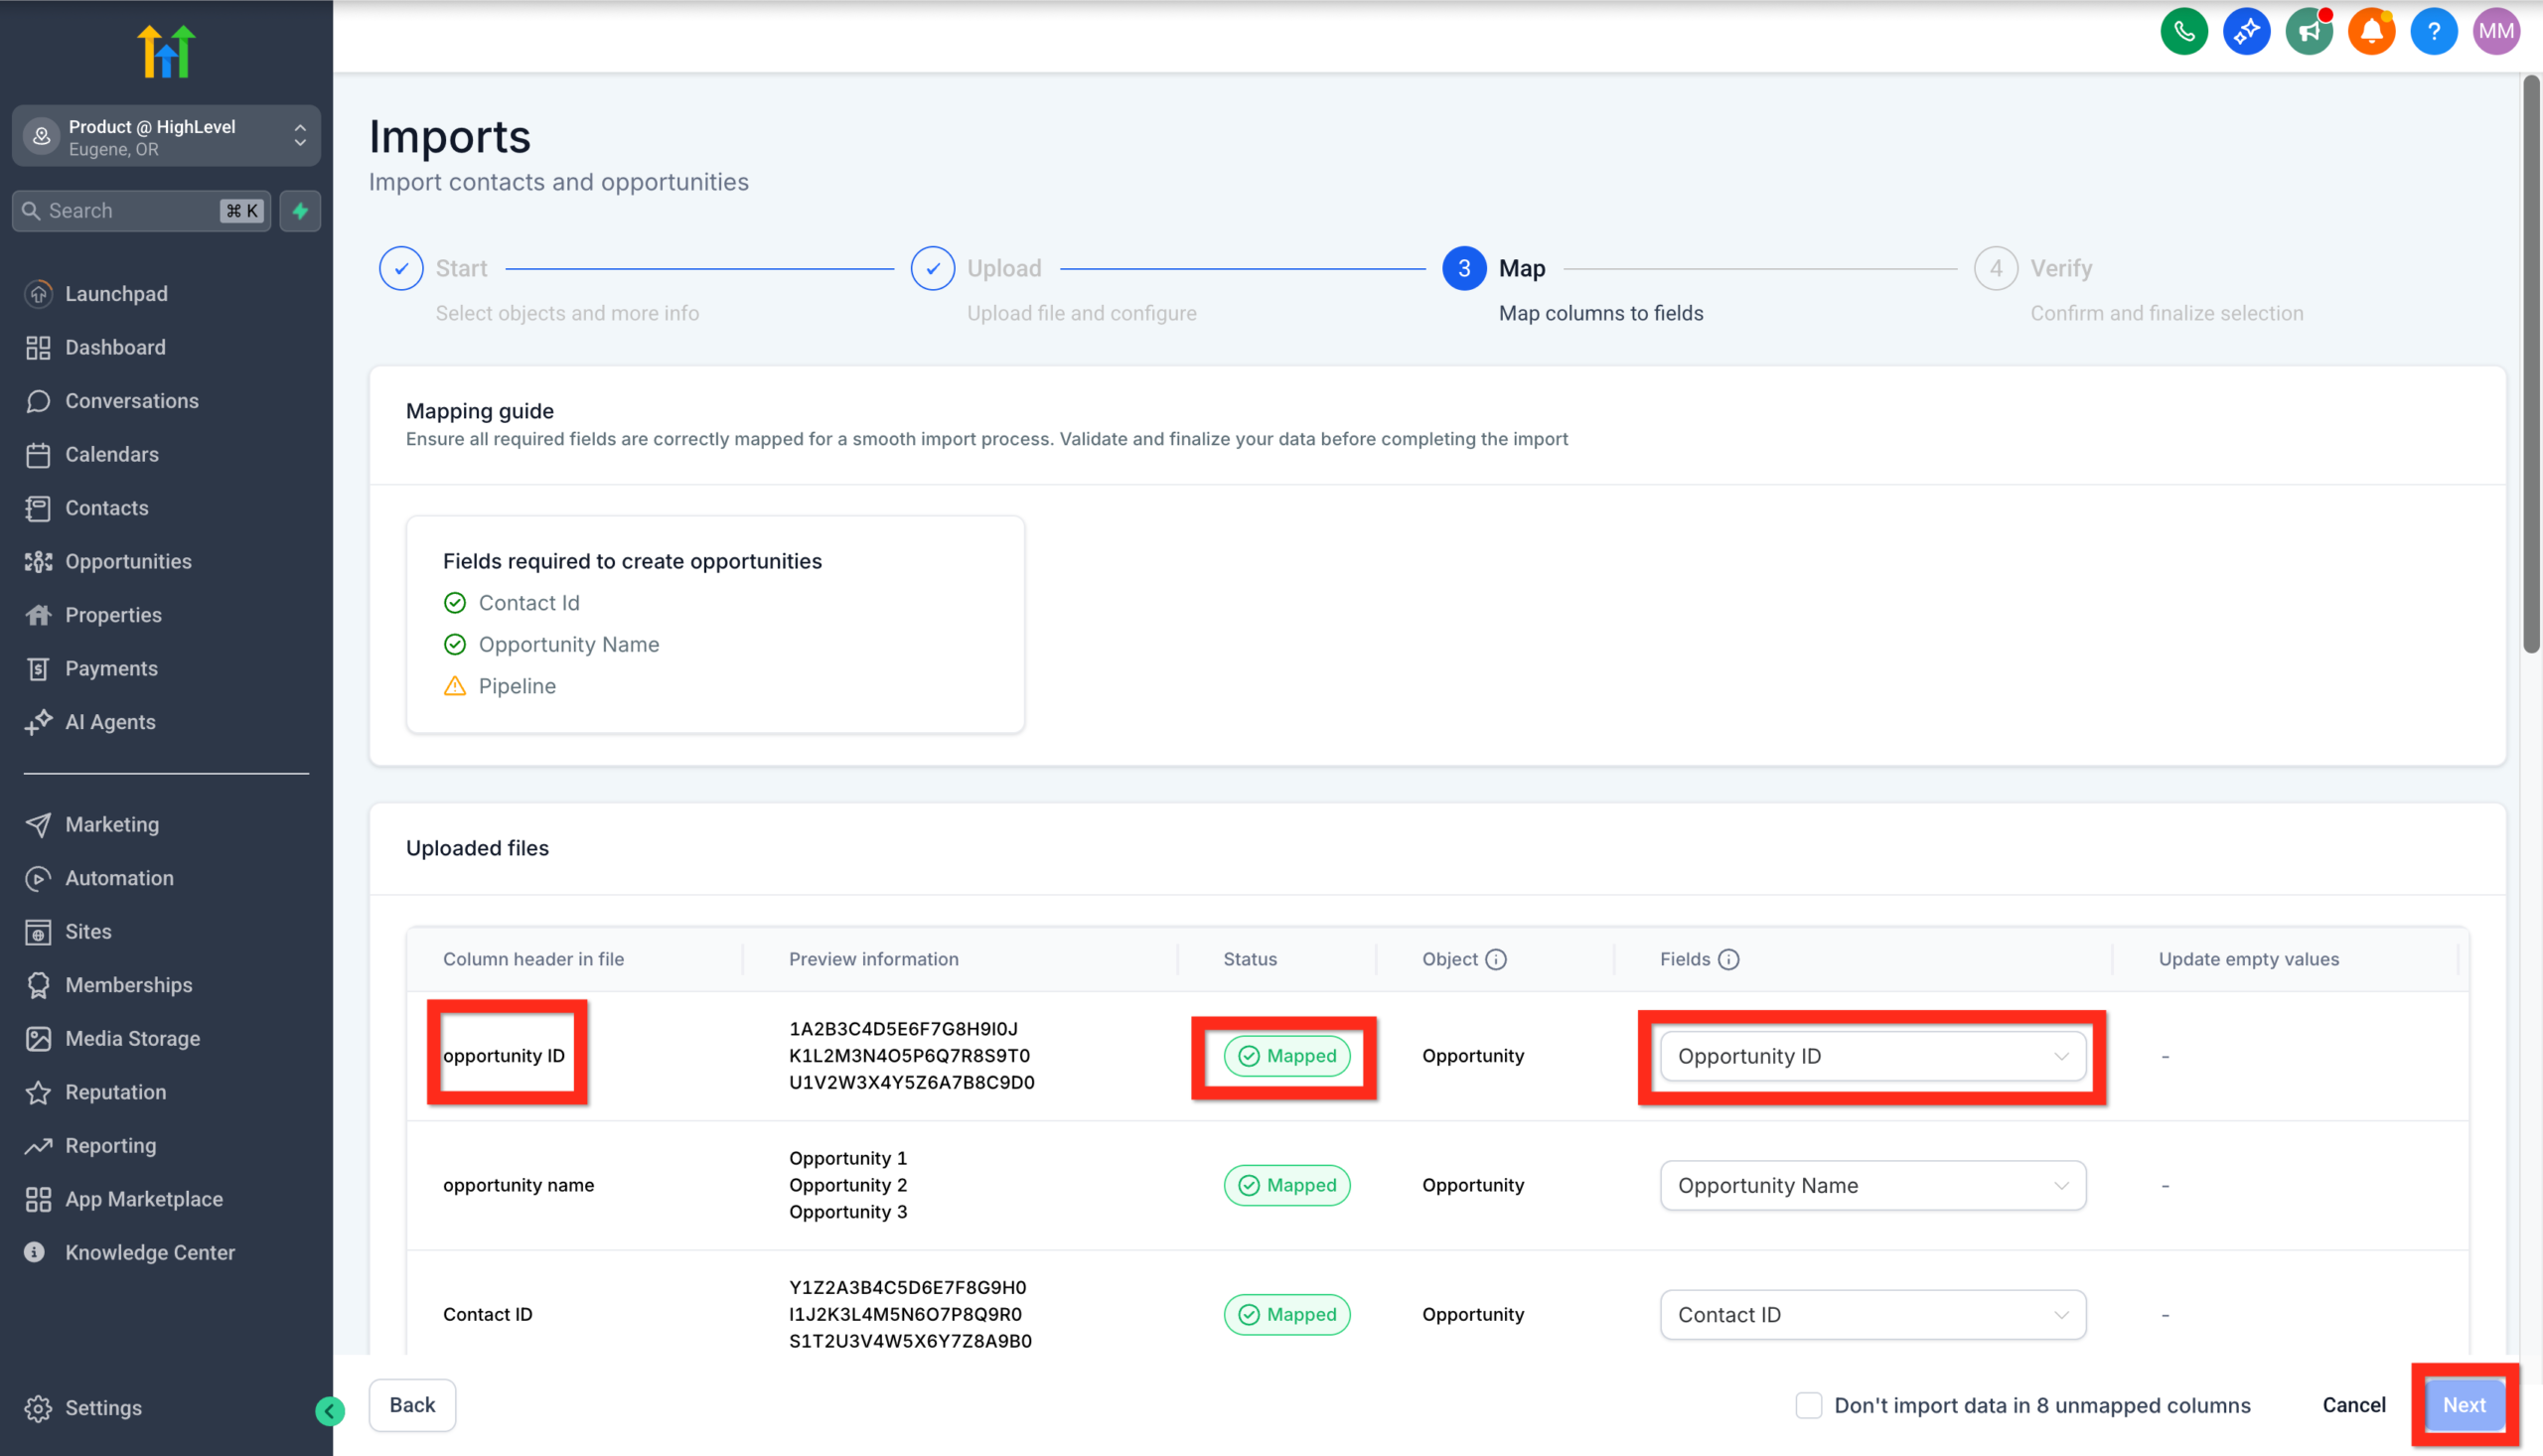 GoHighLevel import wizard, showing the column mapping interface for CSV data to opportunity fields, with the 'Next' button highlighted.” title=”Map CSV Columns to Fields”>
 - Click Next again, review your mappings, and hit Start Bulk Import.
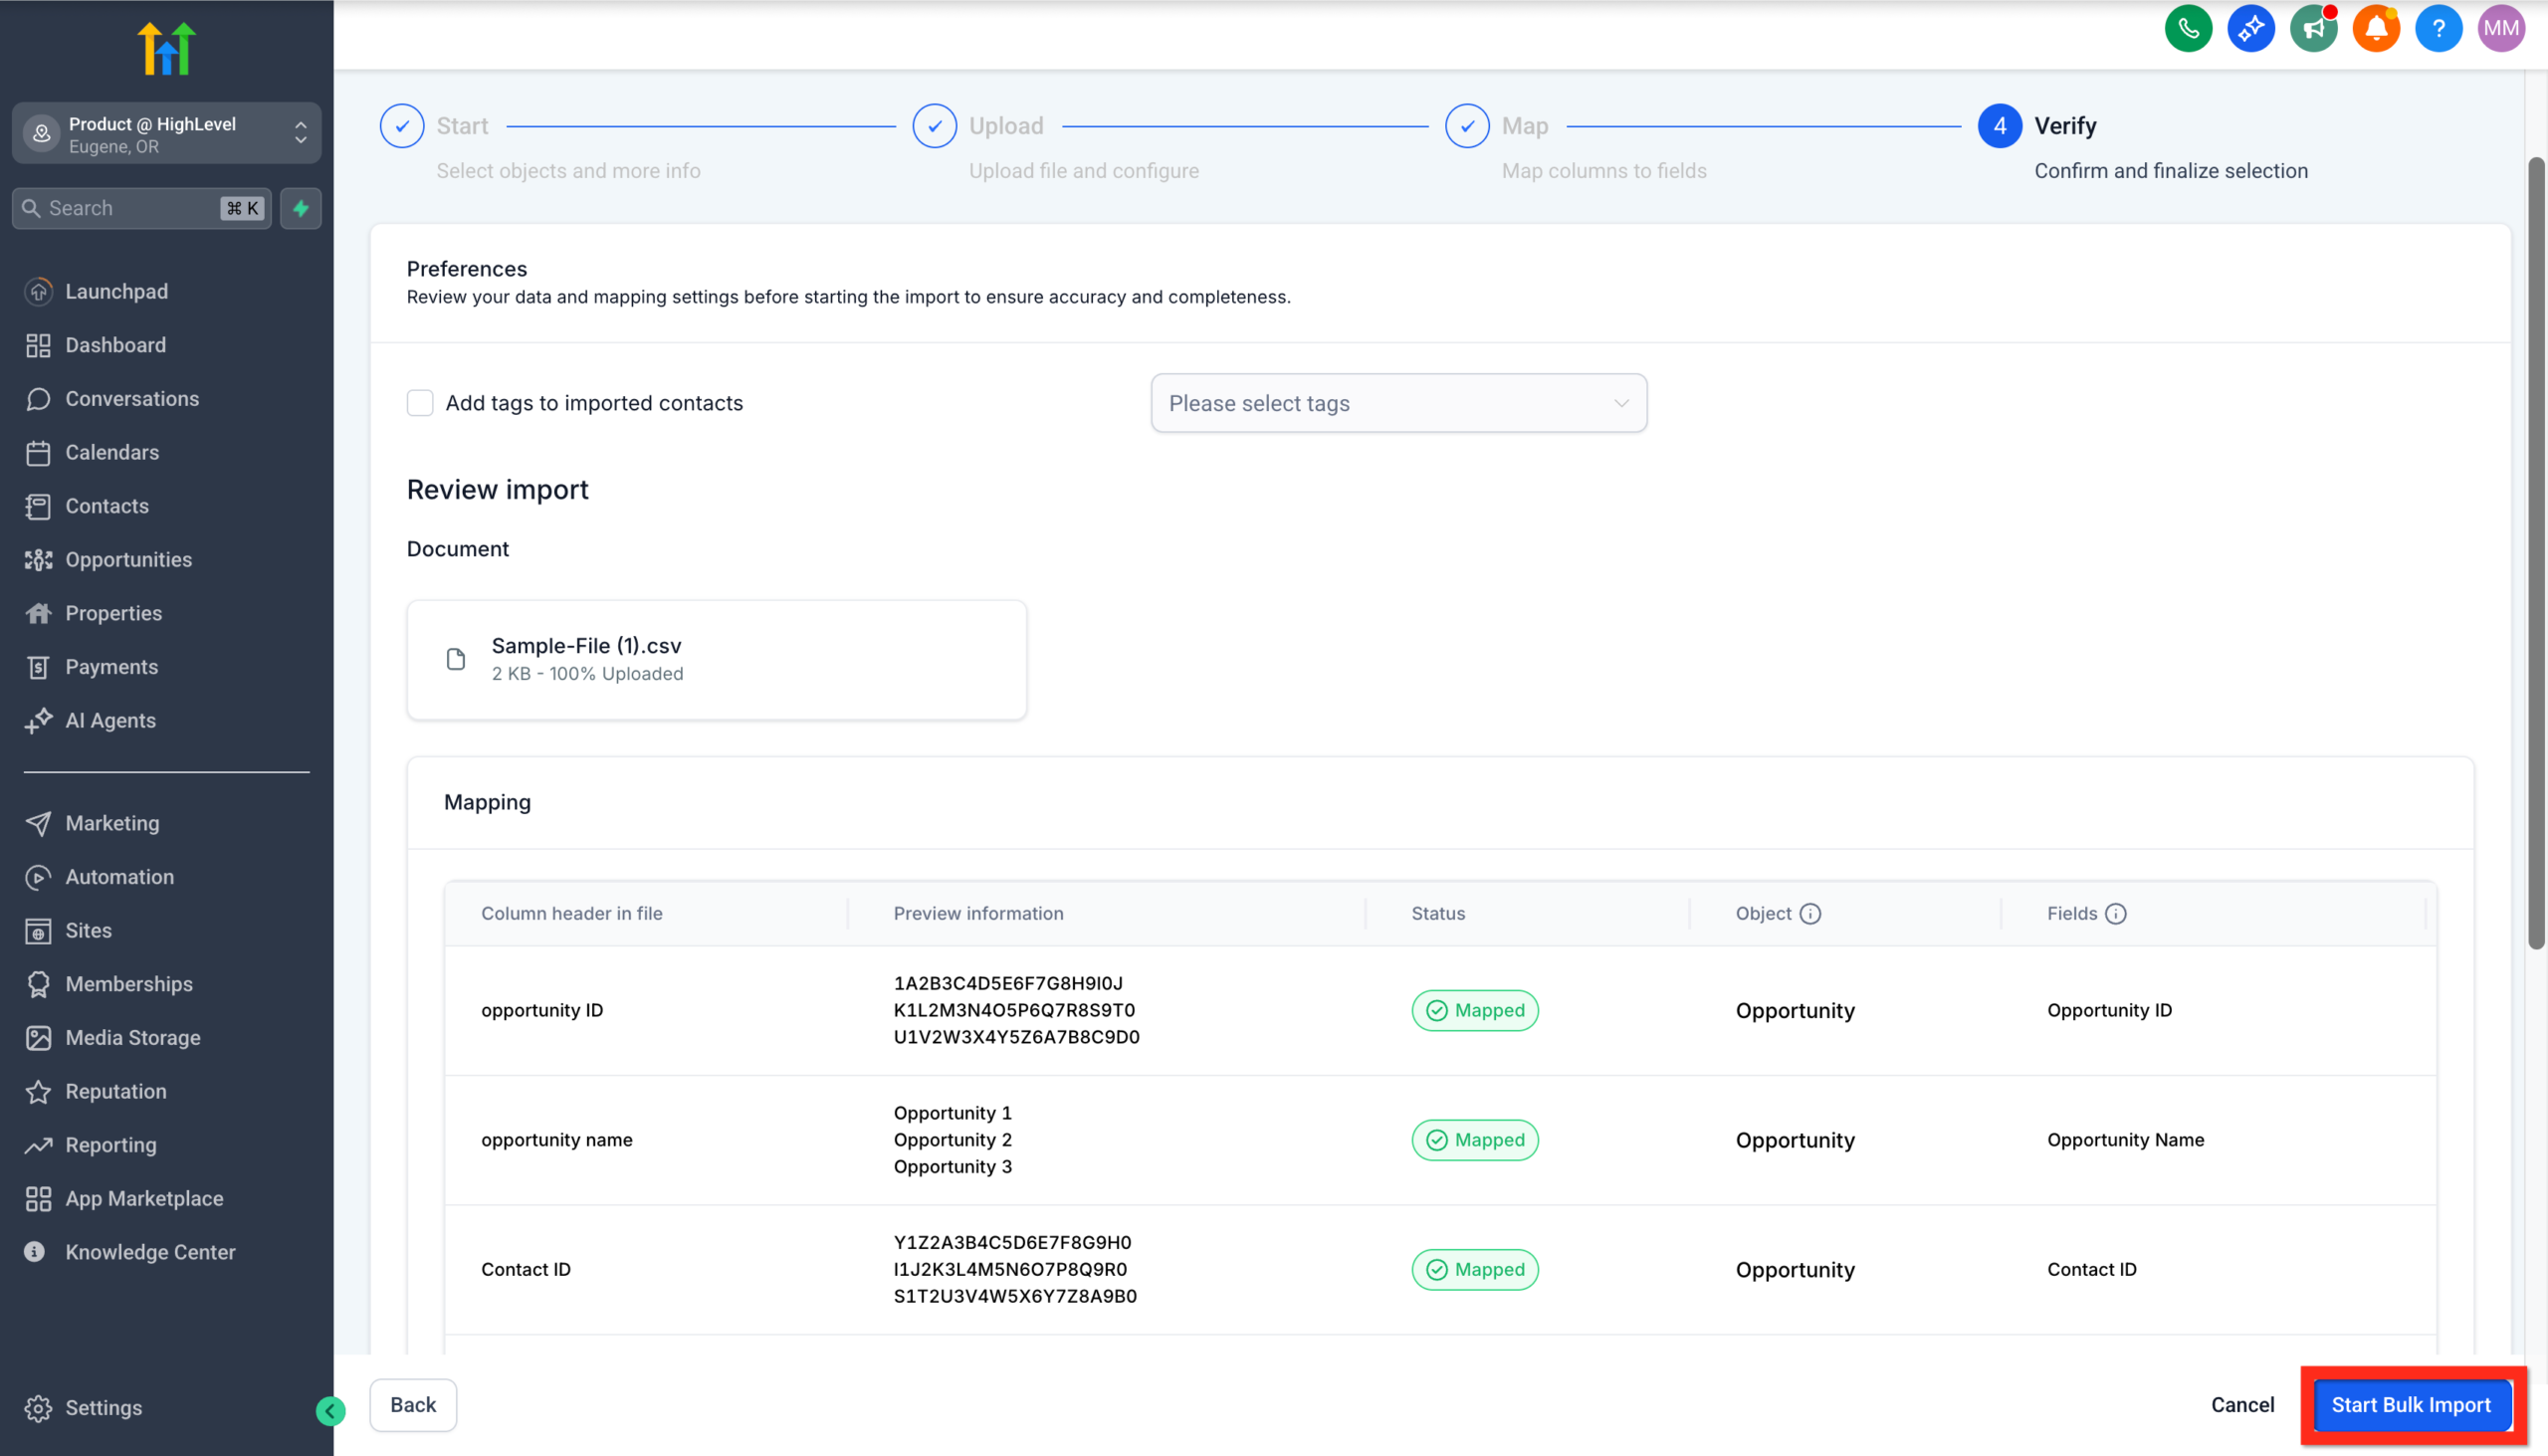 GoHighLevel import wizard, displaying the final review screen before starting the bulk import of opportunities, with the 'Start Bulk Import' button highlighted.” title=”Start Bulk Import Confirmation”>
A few best practices before you run the import:
- Clean your data first. Remove obvious duplicates and dead leads.
- Set a default pipeline and stage. For example, drop everything into New Lead or Qualified, then refine from there.
- Add an origin tag. Tag imported records with something like
import-2026-02so you can report on how those leads perform.
If you’d like a deeper walkthrough of the import process, pair this with a dedicated import guide like Getting Started: Import Existing Contacts into GoHighLevel.
Want this handled for you? Revset Labs can clean your lists, map fields correctly, and set up your first pipelines so your team logs in to a CRM that’s already usable.
Step 3: Create opportunities manually for high-value deals
Not every opportunity arrives in bulk. Sometimes you’ll meet a prospect at an event, on a referral call, or via a one-off email. Those are perfect cases for manually creating an opportunity so nothing falls through the cracks.
To add an opportunity manually in GoHighLevel:
- Go to Opportunities.
- Click Add Opportunity.
- Search for an existing contact or create a new one on the fly.
- Choose the Pipeline and Stage (for example, "Main Sales Pipeline" → "Qualified").
- Enter the Opportunity Name (for example, "ACME – SEO + Ads Retainer").
- Set an Estimated Value and Expected Close Date if you track them.
- Add any relevant notes (source, pain points, decision-makers).
- Click Create.
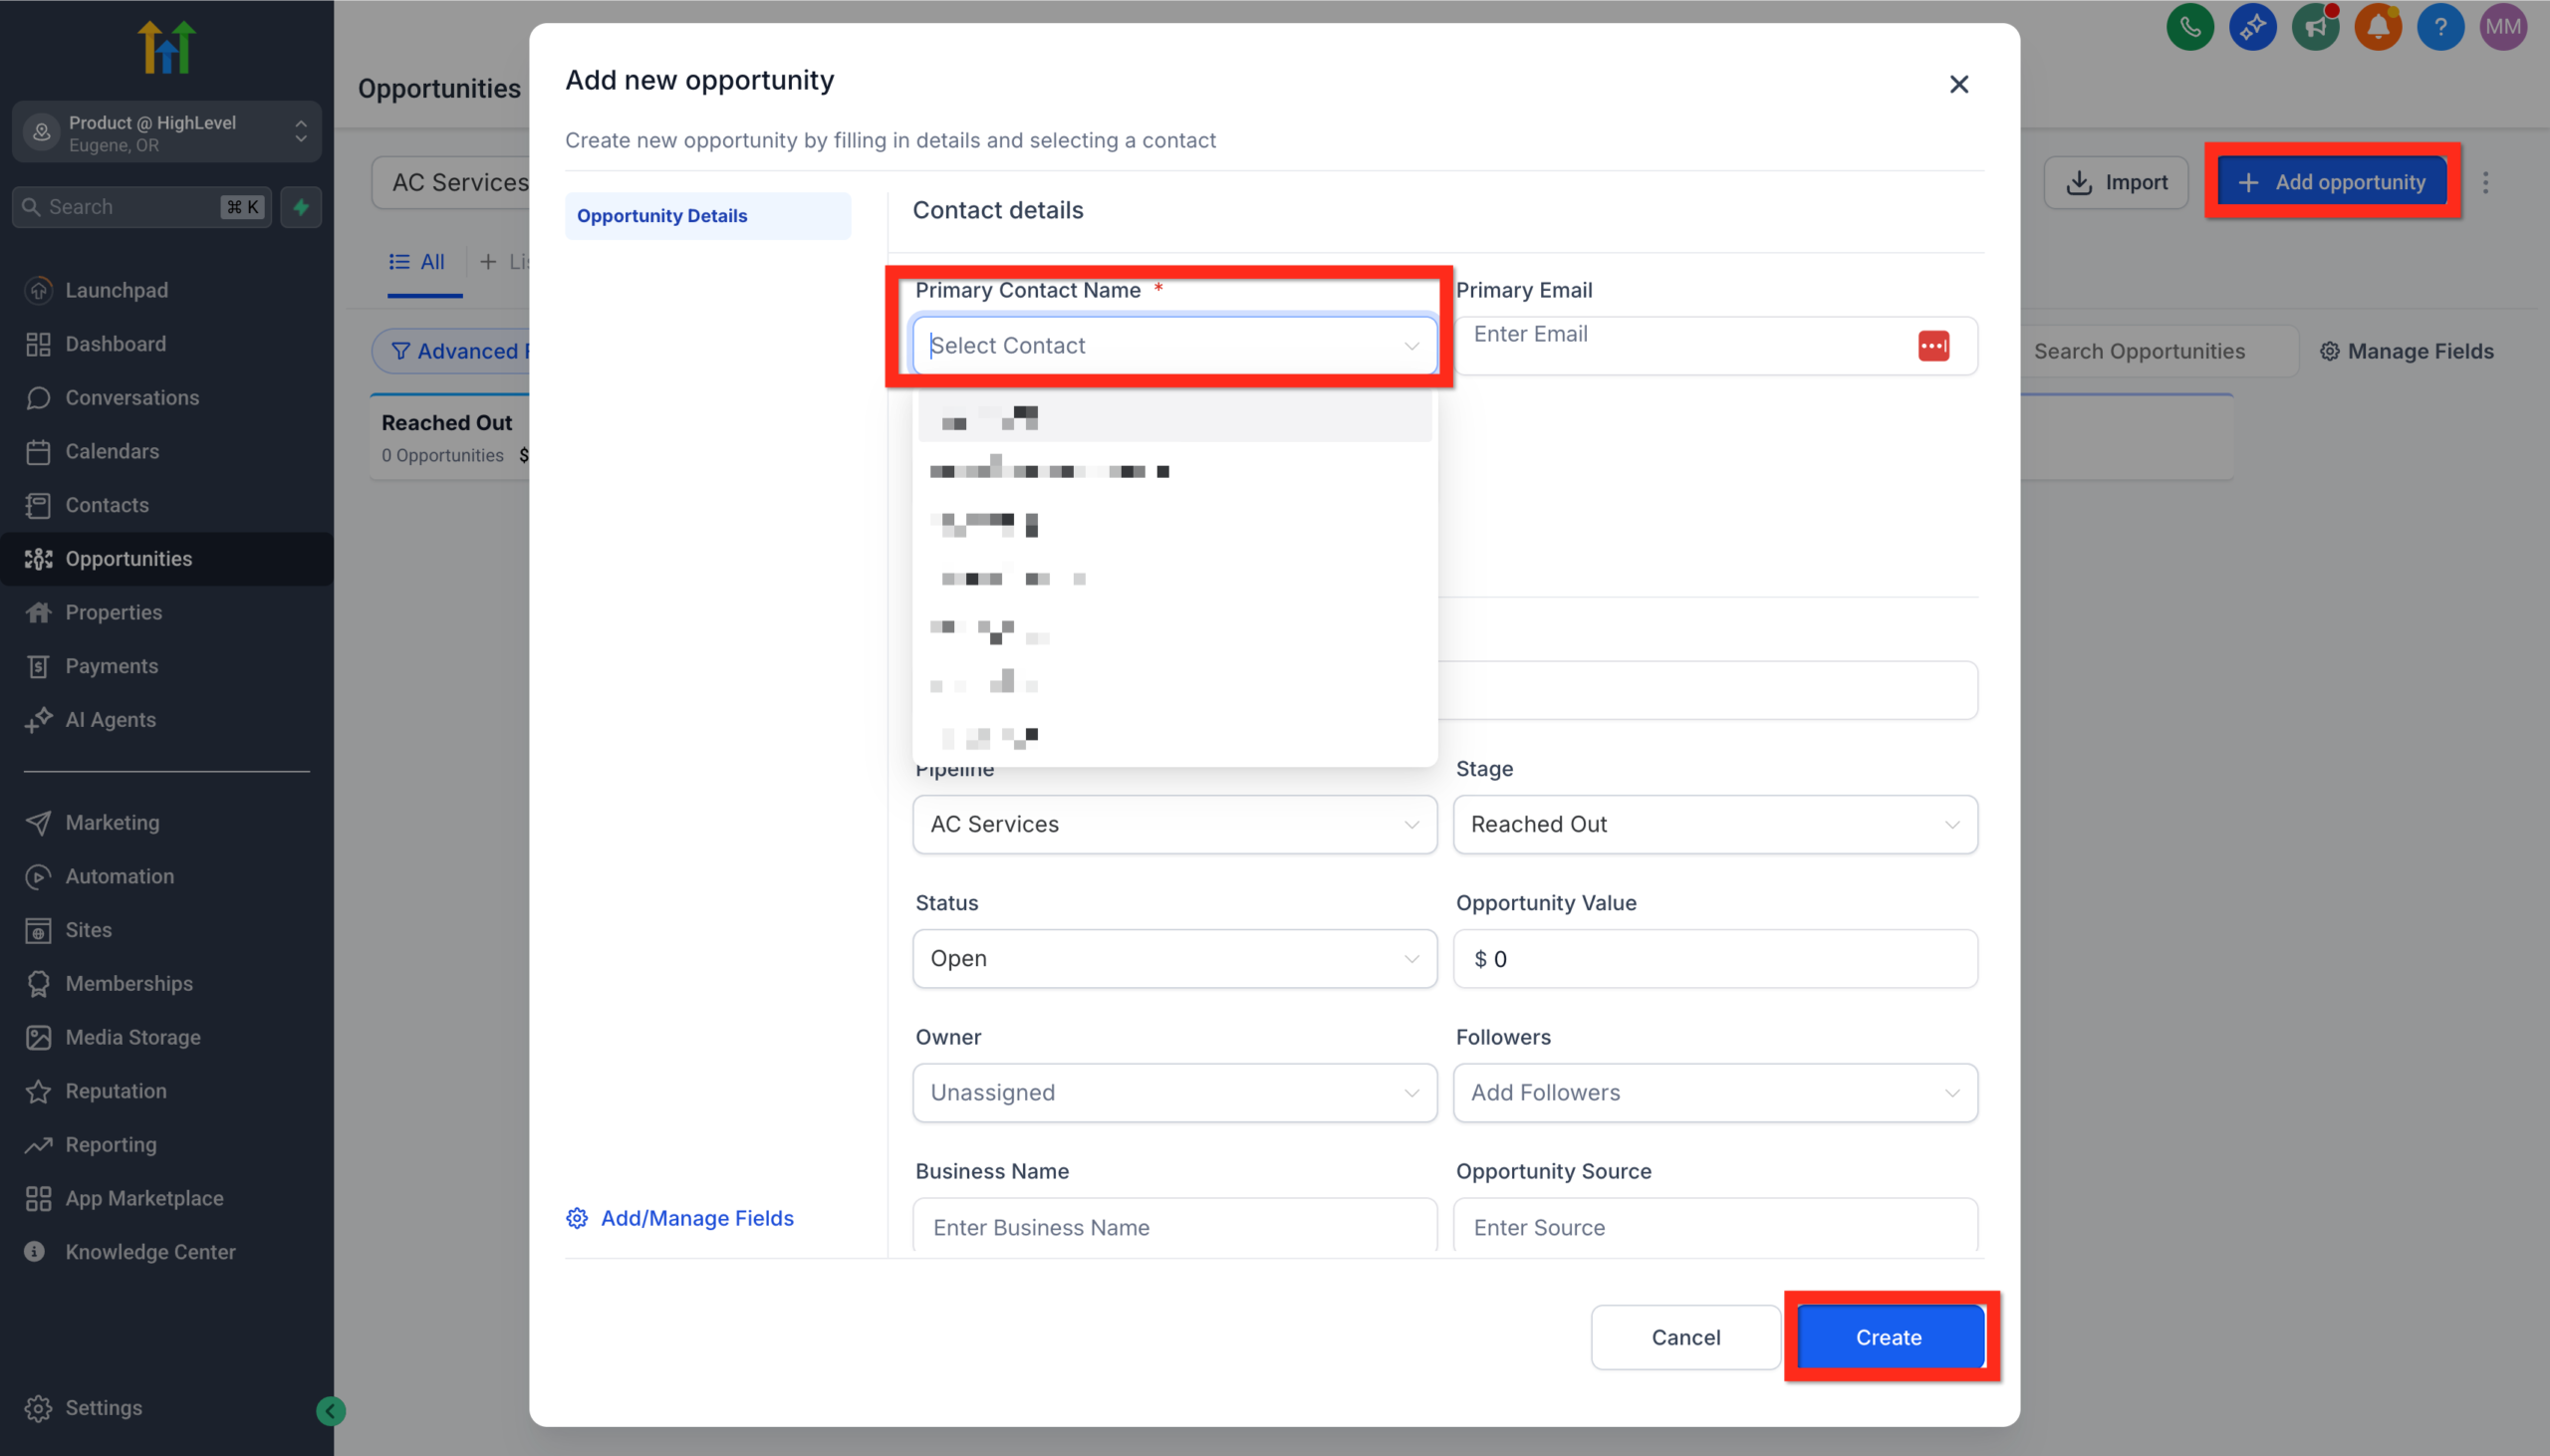 GoHighLevel, showing fields for contact selection, pipeline, stage, opportunity name, value, and the 'Create' button highlighted.” title=”Manually Create Opportunity”>
Want a thorough walk-through? See our Step-by-Step Guide to Creating Opportunities.
Step 4: Automate opportunity creation with workflows
Manual updates work for edge cases. But the real power of GoHighLevel comes from automatically creating and updating opportunities based on what leads do.
You’ll use Workflows plus the Create/Update Opportunity action for this.
Example: Create an opportunity when a form is submitted
- Go to Automation → Workflows.
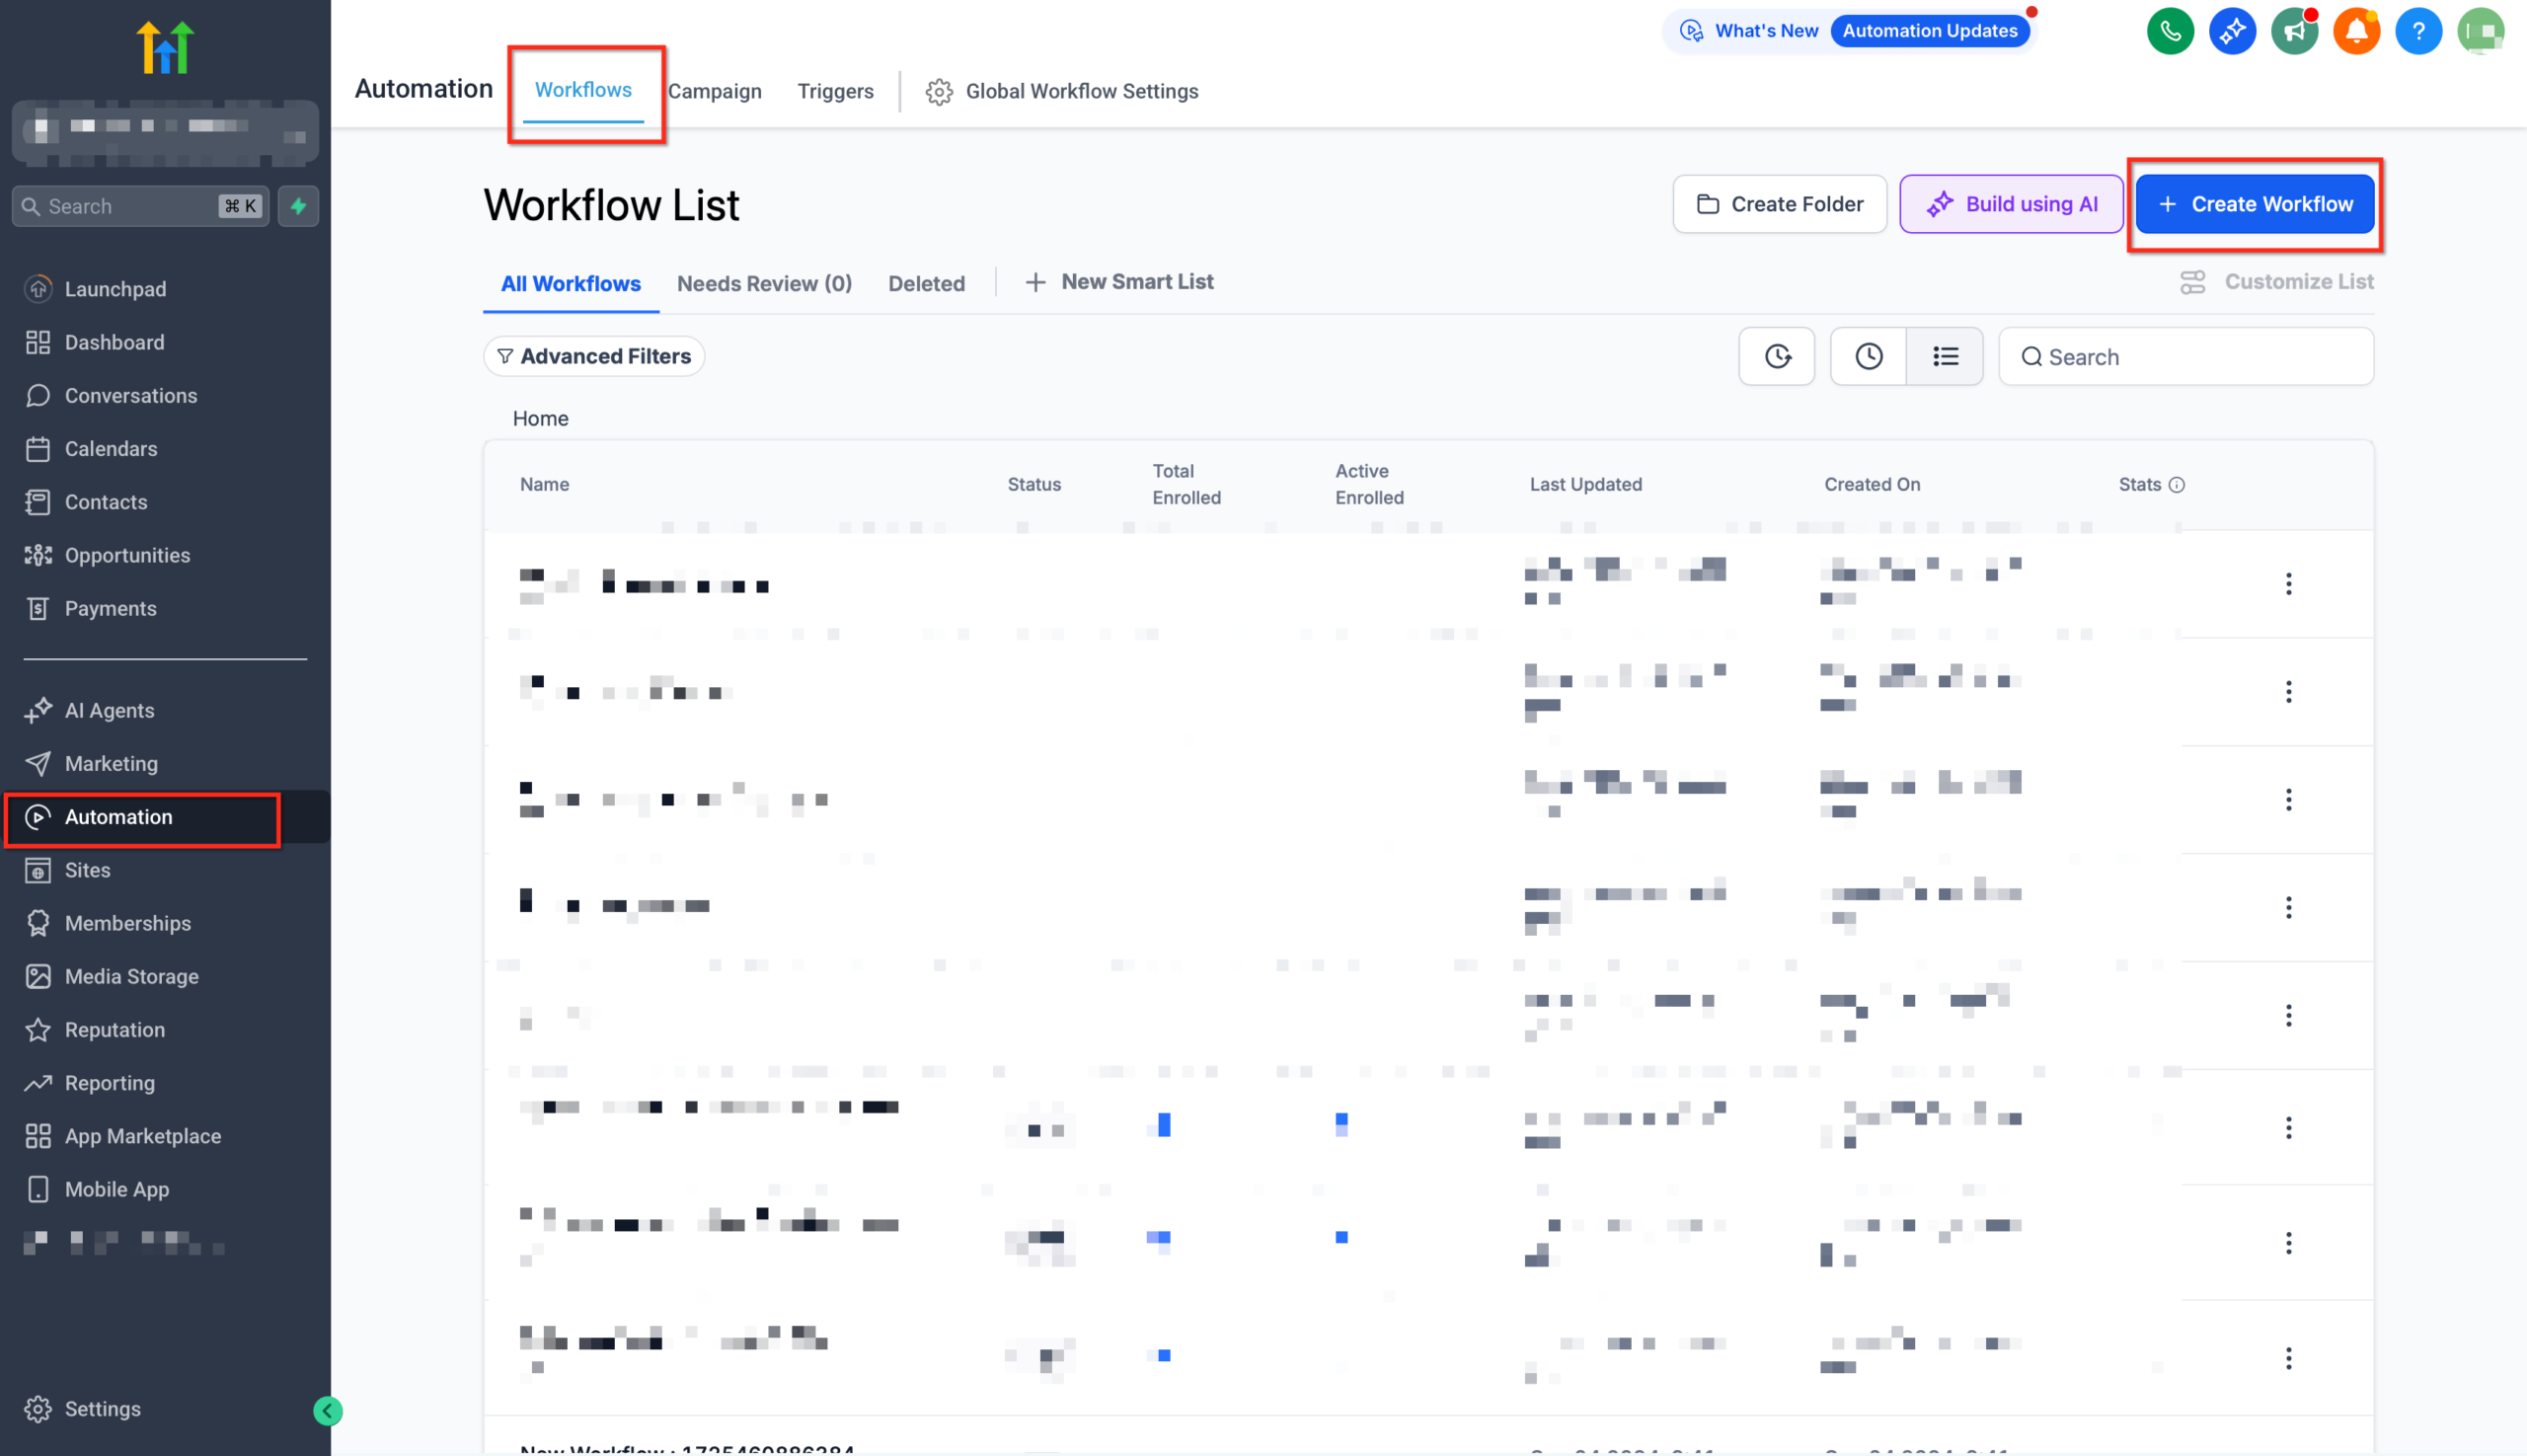 GoHighLevel left-hand menu, with 'Automation' and 'Workflows' highlighted, indicating navigation to the workflow builder.” title=”Navigate to Workflows”>
 - Click + Create Workflow and start from scratch or from a lead-capture template.
- Add a Form Submitted trigger and select the form that collects your lead details.
- Under the trigger, click + Add Action and choose Opportunity → Create/Update Opportunity.
- Pick the Pipeline and Stage (for example, "Main Sales Pipeline" → "New Lead").
- Set Status to Open and map any dynamic fields (contact, value, source).
- Toggle Allow Opportunity to Move if you want this action to update an existing opportunity when the same lead takes another key action.
 GoHighLevel workflow, selecting pipeline, stage, status, and saving the action.” title=”Automate Opportunity Creation Workflow”>
 - Save and Publish the workflow.
From now on, every form submission drops straight into your pipeline as a trackable opportunity—no one has to remember to add it manually.
Other high‑impact triggers you can use
Here are a few more automation ideas using the same Create/Update Opportunity action:
- Customer booked appointment – When someone books a sales call, move or create their opportunity in Booked Call.
- Tag applied (Hot Lead) – When a lead hits a scoring threshold, create or move them into a Qualified or Hot Lead stage.
- Facebook lead form submitted – Pipe ad-generated leads into a dedicated New Facebook Leads pipeline or stage for rapid follow-up.
- Payment received – On successful checkout, move the opportunity to Closed Won and trigger your onboarding workflow.
- Survey submitted – When a qualification survey is completed, create an opportunity in a To Qualify or Proposal Pending stage.
This is where GoHighLevel really replaces the "spreadsheet + sticky notes" system. If you don’t have an account yet, you can spin one up in a few minutes and follow this guide inside the app: Try GoHighLevel free and build your first pipeline.
A simple starter blueprint for your GoHighLevel pipeline
To recap, here’s a practical starter setup you can implement today:
- Create one primary pipeline with clear stages: New Lead → Qualified → Booked Call → Proposal Sent → Closed Won / Closed Lost.
- Import your existing contacts as opportunities, dropping them into New Lead or Qualified with a tag that marks the import.
- Create manual opportunities for any in-flight deals so you don’t lose track of high‑value conversations.
- Build one core workflow that creates or updates an opportunity every time a key action happens (form submitted, call booked, payment received).
- Review your pipeline weekly to close out stale deals, update stages, and note any bottlenecks.
Within a few weeks, you’ll have a live, accurate picture of your sales pipeline—and real data on where to improve.
When to bring in Revset Labs
Revset Labs is an AI automation and marketing agency that specializes in building GoHighLevel systems that actually get used.
If you’d rather not wrestle with CSV mapping, workflow logic, or multi‑pipeline reporting, we can help you:
- Design a pipeline structure that matches your real buying journey.
- Migrate contacts and opportunities from legacy tools into GoHighLevel.
- Build automations that create, move, and close opportunities based on real customer behavior.
- Connect your funnels, calendars, ads, and email so every lead lands in the right stage with the right follow-up.
You bring the offers and sales process. We bring the systems that keep it all running.
Next steps: Build out the rest of your GoHighLevel CRM
Once your pipelines and opportunities are live, you’re ready to connect the rest of your GoHighLevel account:
- Capture and sync people with Getting Started: Create and Manage Contacts in GoHighLevel.
- Bring over your legacy lists with Getting Started: Import Existing Contacts into GoHighLevel.
- Turn traffic into booked calls and deals with Getting Started: Launch a Funnel in GoHighLevel.
If you’re ready to see all of this inside your own account, you can get started with a free trial: Launch GoHighLevel with a free trial.